Choose Your Own Adventure: 5 Projects To Get Students Coding With Python!
Computer Science Education Week is just around the corner … are you ready for some Python fun with your students? How do you plan to spend the week? Will you incorporate a little computer science every day? Will you teach a little computer science history? What types of activities do you like to do? What would Computer Science Education Week be without CODE!
I have tons of projects I like to use, and I’m ready to share some of those ideas with you. Do I share projects that are content specific, math intensive, light on coding or coding intensive? How many lines of code are too many? Should it focus on Python to teach math, Python to enhance math or computer science that uses math?
I decided the answer to all the questions above was, “Yes!” Why make it one size fits all? Therefore, this is a “choose your own adventure” in coding blog. Find something that strikes your fancy. Some projects I would use if I wanted to reinforce and practice math content; other projects engage and spark interest in computer science topics such as cryptography. Why limit computer science to only one week? You might find more than one of these projects fit into your classes at different times of the year. Why not integrate computer science throughout the year? Try one or try all five!
The abridged versions of the featured activities are as follows:
- Rolling Along (theoretical probability) — Students create “unfair” dice using a list, weighting the dice in their favor to win the game.
- Puzzling Number Sense (algebra and higher) — Students create a game to practice number sense used in factoring quadratics. This activity can be used with the TI-Innovator™ Hub.
- The Power of Exponents (pre-algebra and higher) — Students create a game to generate a base number with either a positive or negative exponent for practice. This activity can be used with the TI-Innovator™ Hub.
- Cryptography — Students create either a basic or advanced Caesar cipher to encode and decode messages using modular arithmetic.
- How Good Is Your Memory — A computer science project that uses the TI-Innovator™ Hub to create a sequence of colored lights and sounds the user must remember and repeat in order to continue playing.
Note: The code shown is written for the TI-Nspire™ CX II graphing calculator. However, all of the projects can also be completed using the TI-84 Plus CE Python graphing calculator. The projects involving the TI-Innovator™ Hub include code adjustments (see inline comments or the files provided).
Let's dive into each of the projects in more detail:
1. Rolling Along
|
Imagine a game where each player has fair six-sided dice. After each player rolls the dice, the sum is calculated. If the sum is even you win; otherwise you lose. With the current parameters, we have a “fair game.” If you’re not convinced, listing out the sample space in figure 1, the highlighted squares show all the wins 18/36. |
Fig. 1
|
|||||||||||||||||||||||||||||||||||||||||||||||||
|
How could you change the values on the dice so the sum is even 4 out of 6 times, or 5 out of 6 times?
Can you code a project that will let you investigate your weighted dice theoretically? |
A blank template in reference to what is shown in figure 1.
|
|||||||||||||||||||||||||||||||||||||||||||||||||
|
Create a project named “rollingAlong” (figure 3).
Choose random simulations as the type. This will let you generate random integers.
|
Fig. 3
|
|
I’ve provided a possible solution (figure 4). (Note that #1, #2 and #3 are shown in the code itself as comments. These have been included for instructional purposes to help clarify the purpose of each section of code, but are not essential code elements to include.)
#1 — Import both the ti_system and time library. Time contains the sleep function,
#2 — Create a list dice that has your values for the weighted dice. Create a win and total plays variable.
#3 — Create a while loop that will execute until the user presses esc.
#4 — Print the number of total rolls.
#5 — Roll both the fair dice and the select one from the unfair dice.
#6 — Display both dice, sleep for five seconds so the user can process what was rolled. (Sleep is optional.) Sum the dice. Add 1 to the total plays.
#7 — Print the sum. If the sum is even, the player wins; add 1 to the total wins. Otherwise, print the player lost. Sleep five seconds so the user can process the play. (Sleep optional.) Sleep is not indented under the else; therefore, it pauses five seconds regardless a win or loss.
#8 — After the user presses esc, display the proportion of wins.
|
Fig. 4
|
2. Puzzling Number Sense
Whether I was teaching algebra I or trigonometry, number fluency sometimes impeded content mastery. My students could grasp the big ideas and explain the process of factoring, but would get bogged down by number sense.
So, how do you increase fluency while teaching your content? Here’s a game that, once coded, can be played during warm-ups or any downtime during transitions.
|
Version one: Create a game that generates two numbers. Display the product and the sum. Ask the student to enter the two numbers. Keep track of the number of correct answers given, and stop when the user makes a mistake. This version could be used for classroom competitions or individual goal setting.
Version two: Use with the TI-Innovator™ Hub. Each time the user is correct, play a “happy” tone set by the student. When the user enters invalid values, play an “unhappy” tone. Based on levels passed, change the color of the TI-Innovator™ Hub’s light.
Create a new project named “numbersense” (figure 5).
This project will involve random numbers. Select random simulations as the type. This imports the library that has the randint function.
|
Fig. 5 |
|
Here’s a possible solution for version one (figure 6). (Note that #1, #2 and #3 are shown in the code itself as comments. These have been included for instructional purposes to help clarify the purpose of each section of code, but are not essential code elements to include.)
#1 — Create a variable correct to hold the number of correct answers.
#2 — Create a continuous loop that will run until the line with break.
#3 — Generate two random integers between minus 10 and 10. Store the values in num1 and num2. Calculate and store the sum and product.
#4 — Display the sum and product. Ask the user for the two values. Store the user’s numbers in variables n1 and n2.
#5 — If the user’s numbers are correct, print correct and add one to the correct variable.
#6 — If the user’s numbers are incorrect, display the sum and product of the user’s numbers and exit the while loop.
#7 — Print the number of correct problems. |
|
|
If you’re using the TI-Innovator™ Hub, this is a possible solution for version two (containing all of the code from version one with a few additional pieces) as shown in figure 7.
#1 — Import the library. This will allow you to change the light and play different frequencies. (Note: For the TI-84 Plus CE Python, add the lines import color and import sound.)
#2 — Add a tone for a half second if the answer is correct.
#3 — Add a tone for one second if the answer is incorrect.
#4 — Based on the number of correct answers, change the color of the light on the TI-Innovator™ Hub. Let students find three different light colors that appeal to them.
|
Fig. 7 |
3. The Power of Exponents
Every minute counts. How often do some students have five minutes here, 15 minutes there of downtime while they wait for the teacher to transition from one activity to another? If I give work time in class, some students finish with time to spare; some end up with homework. In the same sense, some students benefit from the number sense activity given above, but others need help with exponents. For differentiation, I might have some students code the number sense and others the power of exponents based on their mastery of the content.
As written, this activity lets students practice integer exponent values. However, it could be modified to have only positive integer exponents.
|
You might notice the layout for this game mirrors that of the number sense activity.
Version one: Create a game that generates a base and an exponent. Display the base and the evaluated number. Ask the student to enter the exponent. Keep track of the number of correct answers given. Stop when the user makes a mistake. This version could be used for classroom competitions or individual goal setting.
Version two: Use with the TI-Innovator™ Hub. Each time the user is correct, play a “happy” tone set by the student. When the user enters invalid values, play an “unhappy” tone. Based on levels passed, change the color of the TI-Innovator™ Hub’s light.
Create a new project named “powerofexponents” (figure 8).
This project will involve random numbers. Select random simulations as the type. This imports the library that has the randint function.
|
Fig. 8 |
|
Follow along for a possible solution to version one (figure 9). (Note that #1, #2 and #3 are shown in the code itself as comments. These have been included for instructional purposes to help clarify the purpose of each section of code, but are not essential code elements to include.)
#1 — Create a variable correct to hold the number of correct answers.
#2 — Create a continuous loop that will run until the line break.
#3 — Generate a base between 2 and 5. Given the base generated, create a reasonable exponent. These numbers can be modified based on your student needs.
#4 — Display the given problem. If the exponent is negative, display as a fraction. Ask the user to enter the value of the exponent. Store the answer in x.
#5 — If the user’s numbers are correct, print correct and add one to the correct variable.
#6 — If the user’s numbers are incorrect, display the correct exponent and exit the loop.
#7 — Print the number of correct problems. |
|
|
If you’re using the TI-Innovator™ Hub, this is a possible solution for version two (containing all of the code from version one with a few additional pieces) as shown in figure 10.
#1 — Import the library. This will allow you to change the light and play different frequencies. (Note: For the TI-84 Plus CE Python, add the lines import color and import sound.)
#2 — Add a tone for a half second if the answer is correct.
#3 — Add a tone for one second if the answer is incorrect.
#4 — Based on the number of correct answers, change the color of the light on the TI-Innovator™ Hub. |
|
4 Cryptography – Basic Caesar cypher with a twist!
Did you ever pass notes back in forth as a kid? Did they get intercepted along the way and read by someone other than the intended recipient? To fix this problem, did you devise a way to disguise your messages using some form of secret encryption known only to your inner circle?
One form of encryption you can do with students of all ages is called a Caesar cipher. In a Caeser cipher, every letter in the message is shifted the same number of spaces. For example, you could shift all the letters three spaces using the key in figure 11.
|
Original |
A |
B |
C |
D |
E |
F |
G |
H |
I |
J |
K |
L |
M |
N |
O |
P |
Q |
R |
S |
T |
U |
V |
W |
X |
Y |
Z |
|
|
|
|
|
|
|
|
|
|
|
|
|
|
|
|
|
|
|
|
|
|
|
|
|
|
|
|
|
Shifted 3 |
D |
E |
F |
G |
H |
I |
J |
K |
L |
M |
N |
O |
P |
Q |
R |
S |
T |
U |
V |
W |
X |
Y |
Z |
A |
B |
C |
Fig. 11
The message: “Tell everyone it is Computer Science Education week!”
Becomes: “Whoo hyhubrqh lw lv Frpsxwhu Vflhqfh Hgxfdwlrqzhh!”
Converting messages by can time consuming. How long would it have taken your student to encode the example above? Using Python, students can quickly create a simple Caesar cipher program of their own. First, we have a few computer science ideas to explore.
How does one tell the computer to move a letter three spaces?
First, you need to know computers use something called American Standard Code for Information Interchange (ASCII) to encode characters as numbers.
|
Each character is given a number. A lowercase “a” has the value 97 while a capital “A” has the value 65. Don’t take my word for it — use the function ord() to convert a character to its ASCII value. Enter print(ord(‘a’)) and print(ord(‘A’)) in the Python shell (figure 12).
|
Fig. 12
|
|
Now change a number back to a character. The command chr() change characters to integers. If 97 is an A, maybe 97 + 3 or 100 is d and 65 + 3 = 68 or D. Let’s verify that (figure 13 and 14). |
Fig. 13 Fig. 14
|
How do you wrap back around to A?
The modulus function “%” will let us wrap back around to A. We need anything larger than Z or 90 to go back to 65. Otherwise, you’ll end up with symbols such as the “]” as seen in the shell. For example, 3 past Z, should be C.
To accomplish this, use %ord(‘Z’) to determine how far past 90 the letter was shifted. Add this amount to one less than the value of A.
If we move 7 past Y, you move to Z, then back to A and move on to F.
Fig. 15
|
Now that you understand how ASCII values and the modulus function % will be used in the code, let’s take a look at the complete project could look (figure 16). (Note that #1, #2 and #3 are shown in the code itself as comments. These have been included for instructional purposes to help clarify the purpose of each section of code, but are not essential code elements to include.)
#1 — First, you need to ask the user for the original message and the shift number.
#2 — The length will be used to determine how many times the loop needs to change characters.
#3 — Creates an empty new variable.
#4 — Create a loop that will execute once for each letter in the message.
#5 — If the letter is lower case, we will keep it lower cased. Shift the letter.
#6 — If necessary, wrap around to “a.”
#7 — Convert the number back to a character.
#8 and #9 — Repeat steps 5-7, except this time use capital letters.
#10 — Leave all punctuation alone.
#11 — Add the new character to the new phrase.
#12 — Display the new message. |
|
Want to kick it up a notch? I think single-bit encryption might be a bit easy to crack.
Let’s take the same idea, but make ten different encryption values. Since the encryption will be more difficult, we need to define both the encryption and decryption values. These values will be stored in lists.
|
Enter the message and whether the user wants to encode or decode.
#1 — In the example list, the first letter and every 10th after that will be shifted 15 spaces. The second letter and every 10th after that will be shifted eight.
#2 — The decode list has the same values except they are all negative.
#3 — Determine if the shift list will encode or decode the message.
#4 — The “+” shift is changed to + shift[i%10].
#5 — This performs a similar shift for capital letters.
|
Fig. 17
|
5. How good is your memory? Let’s test it.
Do you remember the early electronic handheld games with flashy lights and sounds that would test your memory? Lights would flash and you would have to repeat the pattern back (lest face humiliation for only making it through a few rounds). The game might display a blue light, requiring you to press the blue light in response. It would then display a sequence of blue and red, and you would press blue followed by red.
I did an internet search and there exists hundreds of variations of such games for your phone, computer, keychain and, yes, still handheld versions. So, why shouldn’t we have a version for the calculator?
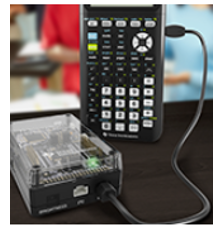
TI graphing calculator connected with the TI-Innovator™ Hub
|
Initially, the game will generate one color and the user will enter that color. If the user is correct, the code will generate a new color to lengthen the sequence by one. As long as the user continues to enter the new sequences correctly, a new color will be continually added and the game will continue.
This game will generate sequences of light colors using the colors magenta, teal and yellow. Each color will have an assigned frequency.
This may be what the code ultimately looks like (figure 18).
#1 — Import new project libraries:
#2 — This will create three colors: 204,139,51; 0,128,128; 250,253,15.
#3 — Creates three different tone frequencies.
#4 — Create the key list name lst that will hold the key. Generate the first number for the game. Values will be from 0 to 2.
#5 — Create a list to hold the player’s colors.
#6 — Turn off the light on the TI-Innovator™ Hub before the game starts.
#7 — Continue play until win doesn’t equal 1.
#8 — This for loop repeats for all items in the key list named lst — p holds the current number to play. Use this number to play the appropriate color and tone for one second. Turn the light off and wait a half second before repeating the loop for the next color.
#9 — To ask the user for the list, we need a playList variable to hold the user’s entered values. Inside the loop, ask for a color.
#10 — Add the color played to the playerC list.
#11 — Convert the letter to a number and add it to the playList. This makes it easier to compare the user’s entered value to the computer’s list which holds numbers 0 to 2.
#12 — Loop through the player’s list. Play the entered colors and corresponding frequencies.
#13 — If the number playing doesn’t match the list, change win to 0 and exit the play loop.
#14 — If everything matched, clear the display history. Print the next level. Add a new color to the end of the key list lst. Pause for two seconds so the user gets ready for play. (Note: For the TI-84 CE Python, replace the line clear_history() with disp_clear().)
#15 — After the loop, tell the user how many rounds the player played before losing.
#16 — Create a color list names lstC to hold the color letters from the key.
#17 — Create the color key list using the number key list.
#18 — Display both the correct list and the user’s list that exited the game. |
|
Looking for more?
I hope you enjoyed your adventures in coding and found something interesting to add to your classes for Computer Science Education week.
The sample code for each project is linked here: both for the TI-84 Plus CE Python programs and TI-Nspire CX II programs. Like I mentioned before, why limit computer science in the classroom to only one week? If you are looking for more math activities integrating coding, check out Explorations with Coding. If you need some basic coding in Python help, explore short activities with 10 Minutes of Code.
About the author: Becky Byer teaches math and computer science at Kelly Walsh High School in Casper, Wyoming. She is a Regional T³™ instructor, Nationally Board Certified and a reader for the AP® Computer Science Principles exam. She is passionate about integrating technology, such as computer programming, to build and enhance student understanding of mathematics.
AP® is a trademark registered by the College Board, which is not affiliated with, and does not endorse, TI products. Policies subject to change. Visit www.collegeboard.org.