3 Fun Ways to Create Seating Charts
On the first day of school, I will interact with five classes of 30-35 students each. It is important to greet students at the door and set a tone that facilitates learning and establishes classroom routines. In my world, the first day of class is only 25 minutes―not much time to take roll and get to know students.
I have tried a variety of ways to put students into assigned seats the first week of school. Compared to how I assign seats after the first unit test, my methods for those first days when I don’t know students names are dramatically different. Over the past 23 years I have tried everything from the dreaded alphabetical seating chart to allowing students to pick their own seats.
In my experience, the best solution is having an assigned seating chart and a plan to change it at the end of the second week of school. This enables me to learn students’ names and personalities. It also gives all students a sense of belonging from day one: the quiet and shy ones who might want to hide in the back are not given that option, and students who are new to the school don’t feel left out when they don’t know whom to sit next to.
Following are some suggestions for making seating charts work in classrooms where students change each hour.
Method 1: Note cards taped on desks
This is my current favorite, even though it is a little time consuming. Print out your class rosters and create blank seating charts. On that chart, number the desks in the order you want them filled. There are always new students added to the roster during the week, and the numbering provides an organized way for you to designate where an unexpected student should sit.
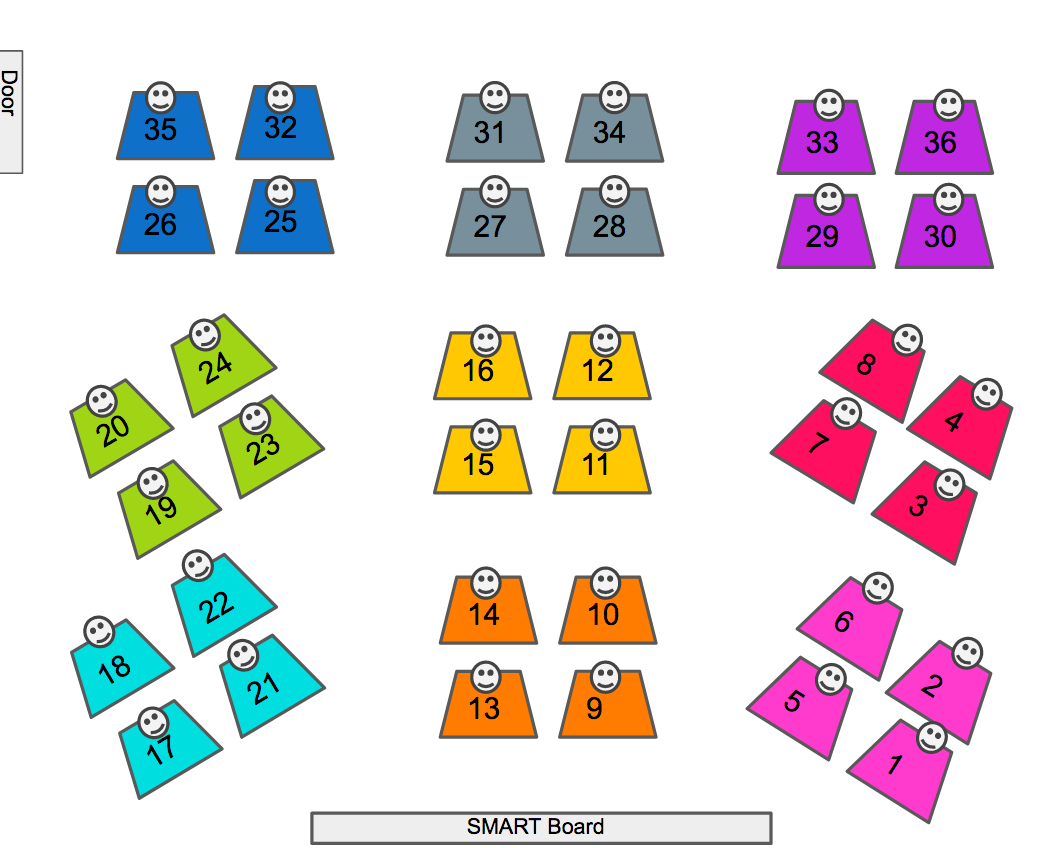
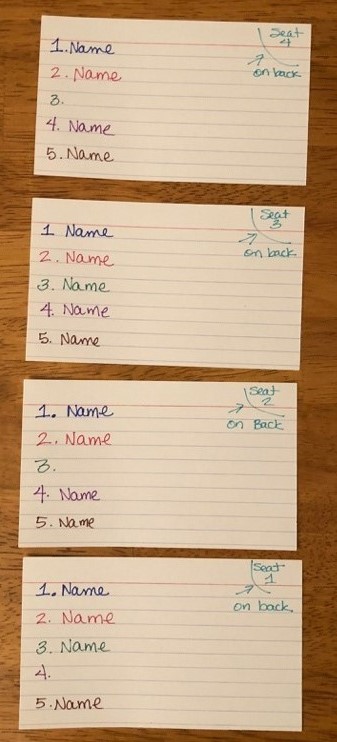
Write numbers corresponding to the desks on the back of the note cards. On the front of each card, write students’ names alongside the hour each will be in class. It works best if you color code the names. (I also leave a space between each hour for those times when I need to correct spellings or change to preferred names.) By the time you are done you have note cards you can tape on each desk and a matched list of names, color coded and in the order of the school day.
It’s my favorite method
Note cards are sturdy and will last two weeks if you ask students not to doodle or write on them. Learning names is a personal challenge, and the process of writing them out on visual aids helps me remember without having to look at the seating chart. I also continuously ask high school students to write their names on their papers. The note cards enable me to see their names while they write them―starting on day one―which also helps me learn.
Disadvantages
It is a little disorganized at first for students finding their seats. This, however, creates opportunities to watch for leaders and helpers who assist their peers. I am always observing student behaviors and learning about my students, even before the final bell rings.Advantages
It is relatively easy to swap out note cards or just cross off names if there are a lot of schedule changes. It also helps with small group formations as everyone can see the names on the desks. Students cannot switch seats because the handwriting on the assignments is mine (if corrections are needed, I ask students to let me make them, which also helps me learn their names faster). The desk note cards make it easier for me to take attendance throughout the week and for students to learn their classmates’ names.Method 2: Using a Projected Seating Chart
Sometimes I use my TI-Nspire™ CX Navigator™ System to establish where students sit. I import their names into the system, then arrange them in a seating chart on the screen as close to the formation of the classroom as possible. You can do something similar using the seating chart feature in most electronic grade books, or by using a document camera to project your handwritten seating chart.
This is not my favorite method for the first day of class with new students because students do not share the same orientation of the classroom as the teacher, so it can cause stress or confusion. It’s better to use this strategy in clases where you already know your students, and they are familiar with class routines and layouts. I do use this method when I change my first seating chart after two weeks. Students are used to seeing this set up each day as we log in to the TI-Nspire™ CX Navigator™ System, and it’s easier to change the seating chart after class routines are firmly in place.
Advantages
This method requires less preparation time than the note card method, and it’s simpler to change the seating chart. Additionally, it is easy to take a screen shot of the seating chart, print it out, and leave it for a substitute when necessary.
Method 3: Placing the responsibility on the students
I have used this with my AP® Calculus AB students. While these students typically spend most of the day together traveling from one AP® class to the next and know one another well, they don’t know me and I don’t know them. Before they enter the classroom, I place a copy of the syllabus on those desks that are available for students to sit. Much like the note card method, I want students to fill the room strategically and not have to change seats after the fact, or have to call out students who chose the back or isolated themselves from the group.
Prior to students entering the room, I hold a sign (below) with written directions at the door. The directions are the same message that is projected on the front screen. One year, I had siblings of different ages in the room so I asked students to arrange themselves in order of birth date without talking. That was the only rule. It took me about 15 minutes to verify the placement.

I love this method!
I immediately learned who my leaders and divergent thinkers were. I observed how students interacted among themselves, which they hadn’t been asked to do. As I checked their order, I learned their names and their birth dates. Notice I did not ask them to arrange themselves by year. Near the end of the semester, that process was one of the personal stories I wrote in a letter of recommendation for one of the student leaders.
The only disadvantage I’ve found to this method is the amount of time it takes for students to organize into their seats. I still had to take roll as a check of their ability to organize. It was possible for them to be wrong.
Just a couple of other ideas for organizing your student seating:
- Sit in alphabetical order by first name without talking.
- Hand students a card as they enter and have them match to something already taped on the desk. This could be a number, shape or word.
None of these seating chart suggestions are completely my own; I borrow ideas that are shared and observe in other teachers’ classrooms. However you choose to create your seating charts, I’d recommend a couple of things to keep in mind. First, arrange your room to keep all students involved in learning, and second, plan the chart so it helps you learn not just your students’ names but their personalities and character traits as well.
AP is a registered trademark of the College Board.About The Author: Kim Thomas is a National Board Certified teacher and T3™ National instructor currently teaching geometry and AP® Calculus BC in a Title I school in Arizona. Kim loves working with and learning from teachers and is passionate about integrating all kinds of technologies into the mathematics classroom. Follow her on Twitter @Kim_math.
Tagcloud
Archive
- 2026
- 2025
- 2024
- 2023
- 2022
-
2021
- January (1)
- February (2)
- March (5)
-
April (6)
- Top Tips for Tackling the SAT® with the TI-84 Plus CE
- Monday Night Calculus With Steve Kokoska and Tom Dick
- Which TI Calculator for the SAT® and Why?
- Top Tips From a Math Teacher for Taking the Online AP® Exam
- Celebrate National Robotics Week With Supervised Teardowns
- AP® Statistics: 6 Math Functions You Must Know for the TI-84 Plus
- May (1)
- June (3)
- July (2)
- August (5)
- September (2)
-
October (4)
- Transformation Graphing — the Families of Functions Modular Video Series to the Rescue!
- Top 3 Halloween-Themed Classroom Activities
- In Honor of National Chemistry Week, 5 “Organic” Ways to Incorporate TI Technology Into Chemistry Class
- 5 Spook-tacular Ways to Bring the Halloween “Spirits” Into Your Classroom
- November (4)
- December (1)
- 2020
- 2019
-
2018
- January (1)
- February (5)
- March (4)
- April (5)
- May (4)
- June (4)
- July (4)
- August (4)
- September (5)
- October (8)
-
November (8)
- Testing Tips: Using Calculators on Class Assessments
- Girls in STEM: A Personal Perspective
- 5 Teachers You Should Be Following on Instagram Right Now
- Meet TI Teacher of the Month: Katie England
- End-of-Marking Period Feedback Is a Two-Way Street
- #NCTMregionals Kansas City 2018 Recap
- Slope: It Shouldn’t Just Be a Formula
- Hit a high note exploring the math behind music
- December (5)
- 2017
- 2016
- 2015