Solution 22151: Activating and Disabling Files on a TI-Nspire™ Family Calculator Using the Press-to-Test Feature.
How can I activate and/or disable Press-to-Test mode on a TI-Nspire family calculator so documents are not accessible during an exam?
To disable documents on a TI-Nspire family calculator so that they are not accessible during an exam, the Press-to-Test feature must be used.
Please Note: Texas Instruments recommends all TI-Nspire family users update the calculator to the latest operating system.
Please use the links below to quickly move to the section you need:
Activate Press-to-Test mode via the calculatorActivate Press-to-Test mode using the TI-Nspire Teacher Software
Disable Press-to-Test mode using another calculator
Disable Press-to-Test mode using the TI-Nspire Family Teacher Software
Disable Press-to-Test mode using the TI-Nspire CX Family Student Software
Disable Press-to-Test mode using the TI-Nspire CX II Connect web-based application
Disable Press-to-Test mode using the TI-Nspire Computer Link
Disable Press-to-Test mode using older TI-Nspire Family Software
To activate Press-to-Test mode via the calculator:
1)If the TI-Nspire family calculator is on, turn it off.
With the calculator off, follow the steps that correspond to your model below:
TI-Nspire Clickpad:
2a) Press and hold [Esc] and [Home] while holding both press [ON] and wait for the Press-to-Test menu to appear, once it appears release all keys.
TI-Nspire CX II, TI-Nspire CX or TI-Nspire Touchpad:
2b) Press and hold the [Esc] key and then press [ON] and continue holding both keys and wait for the Press-to-Test menu to appear, once it appears release all keys.
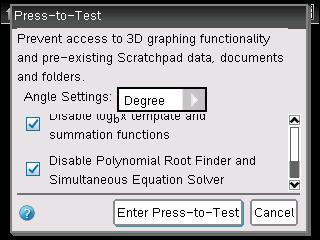
3) You can use [Tab] cycle through options to disable and use the center touchpad [Click] to disable or re-enable options.
Please Note: (TI-Nspire CX II CAS Only) By default, CAS Mode is OFF
4) Once selections are made press [enter] to enable Press-to-Test mode.
TI-Nspire Family Teacher Software (Version 4.2 and above) can put any connected TI-Nspire CX Family calculators into Press-to-Test using the steps below:
Please Note: If you have issues connecting to the calculator to the computer, please follow the steps in Solution 27430.
Additional Note: All currently connected calculators will restart, including any calculators that are already in a Press-to-Test session. You cannot limit this action to a selected set of calculators.
1) Click [Tools] [Prepare Handhelds] [Enter Press-to-Test]
2) Modify any options you wish to change then click [Enter Press-to-Test] then [Enter Press-to-Test]
on the pop up window that appears.
Please Note: Additional information about the above feature, including steps to clear Scratchpad and modify settings can be found in the TI-Nspire CX Teacher Guidebook. For detailed information on all of the Press-to-Test options (Limit geometry functions, Disable Polynomial Root Finder and Simultaneous Equation Solver, etc), refer to the TI-Nspire family Press-to-Test guidebook.
To disable Press-to-Test mode:
You can disable Press-to-Test mode; by connecting the calculator to another TI-Nspire family calculator or by using the TI-Nspire family software.
To disable Press-to-Test mode using another calculator:
1) Connect the TI-Nspire family calculator to another TI-Nspire family calculator then follow the steps that correspond to your model below:
TI-Nspire Clickpad:
2a) On the calculator in Press-to-Test mode, press [home] [2] [ctrl] [home] [9] [1]. Press-to-Test should now be disabled.
TI-Nspire CX II, TI-Nspire CX or TI-Nspire Touchpad:
2b) On the calculator in Press-to-Test mode, press [home] [2] [doc] [9] [1]. Press-to-Test should now be disabled.
TI-Nspire Family Teacher Software (Version 4.2 and above) can disable Press-to-Test on any connected TI-Nspire CX Family calculators using the steps below:
Please Note: All currently connected calculators will restart, including any calculators that are already in a Press-to-Test session. You cannot limit this action to a selected set of calculators.
1) Click [Tools] [Prepare Handhelds] [Exit Press-to-Test]
2) Click [Exit Press-to-Test] on the pop up
window that appears.
Please Note: Additional information about the above feature, including steps to clear Scratchpad and modify settings can be found in the TI-Nspire CX Teacher Guidebook.
TI-Nspire CX Family Student Software (Version 5.3 and above) can disable Press-to-Test on any connected TI-Nspire CX Family calculators using the steps below:
1) Connect the calculator to the computer using the USB cable and open the TI-Nspire CX Family Student Software.
2) Once open click [Window] then [Content Explorer]
3) Look for [Connected Handhelds] at the bottom-left and click on the TI-Nspire CX calculator listed so it is highlighted.
4) Click [Tools] [Exit Press-to-Test] then [Exit Press-to-Test] pop up window that appears.
5) A window will appear showing progress wait for the reboot to complete then click [Done] to complete the process.
To disable Press-to-Test mode using TI-Nspire CX II Connect web-based application (TI-Nspire CX II and TI-Nspire CX CAS II Only):
1) Open the TI-Nspire CX II Connect website using the Google Chrome browser
2) Connect the calculator to the computer using the USB cable
3) Click [CONNECT TO CALCULATOR]
4) In the dialog that appears click your calculator's name from the list and click [Connect]
5) After the software has finished connecting click [EXIT PRESS-TO-TEST]
6) Then [Exit Press-to-Test]
To disable Press-to-Test mode using the TI-Nspire Computer Link Software, the TI-Nspire Computer Link Software must be installed, after installing the TI-Nspire Computer Link Software follow the steps below:
1) Create a folder on the computer's desktop called “Press-to-Test” (name of the folder should be exactly as written, minus the quotations).
2) In that folder, download and save the attached TI-Nspire document called "Exit Test Mode.tns" (name of file should be exactly as written, minus the quotations. Some computers may try to save the file with underscores, (e.g. Exit_Test_Mode.tns). If this happens; replace the underscores with a space). This file is the only file that should be in that folder.
Please Note: Alternatively, you can download the attached "PressToTest(Windows).exe" or "PresstoTest(Mac).zip" which you can double-click to create the folder and file you need for this process.
3) Connect the calculator to the computer using the USB cable and open the TI-Nspire Computer Link Software.
4) Click [Select] on the "Select Handheld" dialog that appears, if your calculator does not appear click [Refresh] then [Select].
5) In the upper-left box click [Desktop] at the top of the list.
6) In the upper-right box locate the “Press-to-Test” folder you created.
7) [Left Click] the “Press-to-Test” folder and hold the [Left Click] down then move your cursor over the lower-right box under the TI-Nspire File Browser then release the [Left Click].
8) The folder will transfer, and the calculator will automatically reboot.
9) Once the calculator reboots your calculator will be out of Press-to-Test mode.
To disable Press-to-Test mode using older TI-Nspire Family Software (Version 4.1 and below) such as TI-Nspire Student Software, TI-Nspire CAS Student Software, TI-Nspire Teacher Software or TI-Nspire Navigator Software follow the steps below:
Please Note: If you have a 31-Character license and are unable to activate your software to disable Press-to-Test please contact TI-Cares for assistance converting to a new, account-based subscription license.
1) Create a folder on the computer's desktop called “Press-to-Test” (name of the folder should be exactly as written, minus the quotations).
2) In that folder, download and save the attached TI-Nspire document called "Exit Test Mode.tns" (name of file should be exactly as written, minus the quotations. Some computers may try to save the file with underscores, (e.g. Exit_Test_Mode.tns). If this happens; replace the underscores with a space). This file is the only file that should be in that folder.
Please Note: Alternatively, you can download the attached "PressToTest(Windows).exe" or "PresstoTest(Mac).zip" which you can double-click to create the folder and file you need for this process.
3) Connect the calculator to the computer using the USB cable and open the TI-Nspire Software.
4) Click [Window] then [Content Explorer].
5) Look for [Connected Handhelds] at the bottom-left and click on the TI-Nspire calculator listed so it is highlighted.
6) Above Connected Handhelds under [Computer] click the [Look in] drop-down and select [Desktop] to locate the Press-to-Test folder.
7) Drag and drop the Press-to-Test folder onto the Connected
calculator's section.
8) The file will transfer, and the calculator will automatically reboot.
9) The green light on the top will no longer be on and the calculator will be out of Press-to-Test mode.
Please Note: The Press-to-Test feature also works with the TI-Nspire calculator's interchangeable TI-84 Plus Keypad. Programs and Apps not allowed during testing will be temporarily disabled and then restored after the exam. When the TI-84 Plus Keypad is inserted, the Press-to-Test feature configures the TI-Nspire calculator just like the TI-84 Plus family graphing calculators. For more information, please see the Press-to-Test functionality on the TI-84 Plus family for more information.
If you are unable to exit Press-to-Test or require additional assistance, please contact TI-Cares.
Last updated: 5/03/2024