Knowledge Base
Solution 39338: Enabling TI-Nspire CX Navigator Functionality in the TI-Nspire CX Premium Teacher Software.
How do I enable TI-Nspire CX Navigator functionality in the TI-Nspire CX Premium Teacher Software?
To enable TI-Nspire CX Navigator functionality in the TI-Nspire CX Premium Teacher Software please follow the steps below:
1) Connect your TI-Nspire Navigator or TI-Nspire CX Navigator Access Point to your computer either before launching the software or after launching the software and wait for the software to detect the Access Point to enable the functionality.
Please Note: There may be a minute delay for the functionality to completely enable.
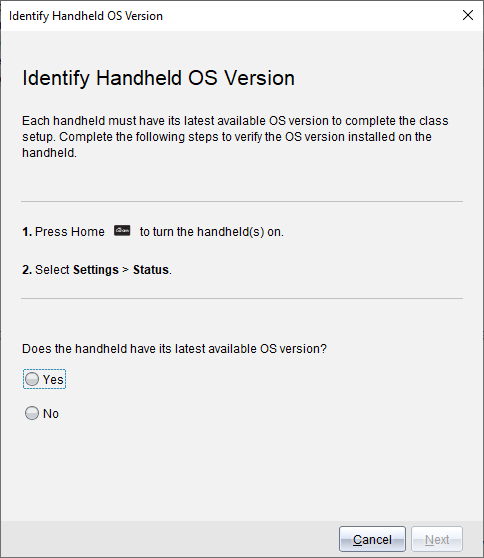
2) After the functionality is enabled you will be prompted to update your calculators to the latest version of OS:
Alternatively you can follow the steps below to enable this functionality:
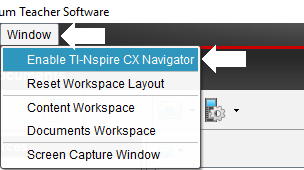
1) With the TI-Nspire CX Premium Teacher Software open click [Window] [Enable TI-Nspire CX Navigator].
Please Note: If this option is greyed out click [File] [Settings] [Handheld Type] then select [TI-Nspire CX / TI-Nspire CX II]. You will next be prompted to close the software choose [Quit Now] then re-launch the software and the option should be available.
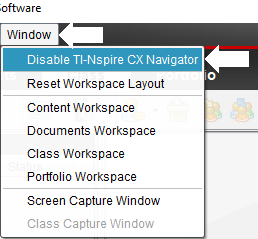
If you enabled this mode by accident and want to disable it follow the steps below:
1) With the TI-Nspire CX Premium Teacher Software open click [Window] [Disable TI-Nspire CX Navigator]
If you have questions about the information listed above, please contact TI-Cares for additional assistance.