In this lesson the spread of a disease will be explored by looking at a simulated experiment that was conducted by a class of 25 students using the
random number
feature of the calculator. Data from the experiment will be entered into a table of values and a
![]()
![]()
A random number is a number chosen as though by chance in some specified range. The random number feature on the TI-89 can be used to generate a series of one or more random numbers.
![]()
![]()
scatter plot
of those values will be created.
![]()
![]()
A scatter plot is a graphical display of data plotted as points on a coordinate plane to show the relationship between two quantities.
![]()
![]()
The premise of the experiment is that an initial person gets a disease on the first day and infects another person on the second day. The two people who have the disease each infect another person on the third day. The process is repeated daily until all the people in the class have the disease. The number of people who have the disease is noted each day and recorded. It is okay for the people chosen to be infected in a given day not be newly infected.
A Model to Describe the Growth of a Disease (or a Rumor)
Students in the experiment were numbered 1 through 25. The students then entered their assigned number into their calculator's
random seed
so that each student's calculator would generate a different sequence of random numbers. Click here to see keystroke instructions to assign a number to the random seed.
![]()
![]()
The random seed is a number stored in the calculator which determines what random number will be generated next. When a random number is generated, the seed is changed so that the next random number will be different. However, two calculators starting with the same random seed will generate identical sequence of random numbers. The random seed is set to 0 at the factory, so in order to ensure that each student will generate a different sequence of random numbers, it's necessary to set the random seed to different values in each of their calculators.
![]()
![]()
If this is the first time you have opened the Stats/List Editor since you turned on your calculator, you will see the following dialog box.
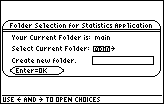
This dialog box can be used to create a separate folder for statistics applications, but you don't need to do that for this activity.
If you want to repeat the experiment do NOT reset the random seed values in the student calculators as done initially. Repeating that process will produce exactly the same results.
Random Integer Generator Feature
To begin the experiment the teacher randomly chose a student who would initially have the disease by using the command TIStat.randInt(1,25), which generates a random integer between 1 and 25. Click here to see keystroke instructions to enter the random integer command.
Generating the Experimental Data
The initial student then chose another person at random with the command TIStat.randInt(1,25). This made two infected people at the end of the second day unless the infected person chooses their own number. In this case there is only one infected person on day 2. On the third day, the two infected people choose two more people at random by using the same command. The selected students may or may not have already had the disease, and if a student that had already been infected was repeated, the student who generated the repeated value did not generate a new value. On subsequent days, each of the people infected then chose another person at random. Each day the total number of infected people was recorded. This process continued until everyone had been infected. The table below is a record of the number of people that had been infected.
| Day | Number Infected |
| 1 | 1 |
| 2 | 2 |
| 3 | 4 |
| 4 | 8 |
| 5 | 13 |
| 6 | 20 |
| 7 | 24 |
| 8 | 25 |
Displaying the Stats/List Editor
Before you can enter this data into your calculator, you must display the Stats/List Editor.
-
Display the Flash Applications menu by pressing


- Highlight "Stats/List Editor" by using the cursor movement keys
-
Select "Stats/List Editor" by pressing

-
Use the main folder and open the Editor by pressing
The Stats/List Editor
The screen below is called the Stats/List Editor.
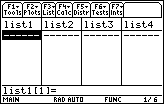
Values for the Days
- Enter the "Day" values in list1
| list1 (Day) |
| 1 |
| 2 |
| 3 |
| 4 |
| 5 |
| 6 |
| 7 |
| 8 |
As you enter a value, it should appear in the Edit Line at the bottom of the screen. When you press
![]() the value should appear in the list. If you enter an incorrect value into the list, position the cursor at that value and simply enter the correct value. You can insert an entry in the list with
the value should appear in the list. If you enter an incorrect value into the list, position the cursor at that value and simply enter the correct value. You can insert an entry in the list with
![]() [INS] or delete an entry with the
[INS] or delete an entry with the
![]() key.
key.
|
|||
|
|
|||
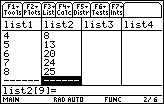
Data for the Number of Infected People
- Move to the second column, list2, with the cursor movement keys
- Enter the "Number Infected" values
|
list2 Number Infected |
| 1 |
| 2 |
| 4 |
| 8 |
| 13 |
| 20 |
| 24 |
| 25 |
List1 and list2 should contain the data.
Create a Scatter Plot
Now make a scatter plot of the data.
-
From the Stats/List Editor, display the Plot Setup screen by pressing

-
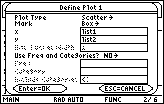
Open the Plot1 dialog box to define the scatter plot by pressing

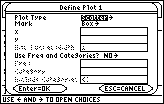
If "Plot Type" does not indicate "Scatter,"
-
Select "Scatter" from the Plot Type submenu by pressing

If "Mark" does not indicate "Box,"
- Select "Box" from the Mark submenu
Define the Lists that Contain the Variables
- Move the cursor to the entry labeled "x" by using the cursor movement keys
-
Open the list of variables by pressing
 [VAR-LINK]
- Highlight "list1" by using the cursor movement keys
-
Paste the name "list1" to the dialog box by pressing
-
Save the entry by pressing
-
Move the cursor to the entry labeled "y" and paste "list2" from the VAR-LINK menu, then press
The Define Plot 1 dialog box should have the selections shown.
Create the Scatter Plot
-
Save these settings and return to the Plot Setup dialog box by pressing
-
Select the Zoom Data feature and view the graph by pressing

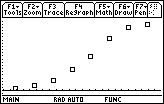
This shape is called a logistic curve.
3.1.1 What are the window values for the scatter plot shown above? Click here for the answer.
|
|||
|
|
|||