Clear Home screen, Clear Edit Line, and Enter f(x)
-
Go to the Home screen by pressing
 .
.
-
Clear the Home screen by pressing

 .
.
-
Clear the Edit Line by pressing
 .
.
-
Enter f(x) by pressing
 [F]
[F]


.gif)
 .
.
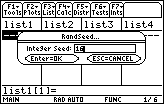
Assigning a Number as the Random Seed
-
Open the Flash Applications menu by pressing


- Use the cursor movement keys to highlight "Stats/List Editor"
-
Open the Editor by pressing
-
Open the Random Seed dialog box by pressing

 [A]
[A]
- Enter a number in this box
-
Save the number and close the dialog box by pressing
-
Return to the Home Screen by pressing

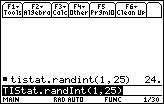
Random Integer Generator
To generate a random integer between 1 and 25,
-
Move to the R's in the Flash Apps portion of the TI-89 catalog by pressing

 [R]. (Note: You need press
 to access the R above
 .)
.)
- Move the cursor to randInt( by using the cursor movement keys
-
Paste the command to the Edit Line by pressing
-
Complete the command TIStat.randInt(1,25) by pressing


.gif)
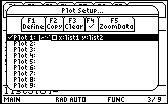
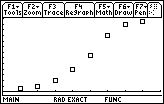
Creating a Scatter Plot with User Defined Window Values
After defining Plot 1 by setting the options in Plot 1's dialog box, you should be at the Plot Setup... screen, as shown below.
Set the Window Values
-
Open the Window Editor by pressing
 [WINDOW]
- Set the values of the Window Editor parameters as shown below
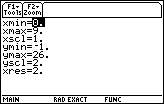
The values are set a little outside the values in the table to make sure that each point is shown in the graph window.
-
Display the scatter plot again by pressing
[GRAPH].
Enter "list1" into the "X List" box
- Move the cursor to the box labeled "X List" by using the cursor movement keys
-
Open the list of variables by pressing
 [VAR-LINK]
- Highlight "list1" by using the cursor movement keys
-
Paste the name "list1" to the dialog box by pressing
-
Save the entry by pressing
Enter "list2" into the "Y List" box
- Move the cursor to the box labeled "Y List" by using the cursor movement keys
-
Open the list of variables by pressing
[VAR-LINK]
- Highlight "list2" by using the cursor movement keys
-
Paste the name "list2" to the dialog box by pressing
-
Save the entry by pressing
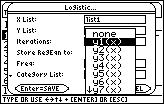
Store the Regression Equation into y1
-
Move the cursor to the line labeled "Store RegEqn to:" by using the

 keys
keys
-
Display the options by pressing

- Highlight y1 (or the function where you would like to store the regression equation) by using the cursor movement keys
-
Paste that value into the dialog box by pressing
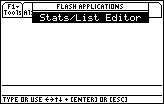
Displaying the Stats/List Editor
The TI-89 Statistics and List Editor, an application that is found in newer TI-89's, can be freely downloaded from TI's web site.
Find out if your calculator has the Statistics and List Editor application.
-
Display the Flash Apps menu by pressing
If one of the menu items is "Stats/List Editor," you are ready to proceed.
If you do not have this feature, obtain the free upgrade from the TI Education web site at http://education.ti.com/product/tech/89/apps/apps.html. You will need a Graph Link cable and TI-Graph Link(89) software to install the upgrade from your computer to your calculator.
Entering Data
Before you can enter data into your calculator, you must display the Stats/List Editor.
-
Display the Flash Applications menu by pressing
- Highlight "Stats/List Editor" by using the cursor movement keys
-
Select "Stats/List Editor" by pressing
If this is the first time you have opened the Stats/List Editor since you turned on your calculator, you will see the following dialog box.
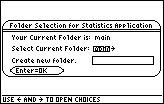
This dialog box can be used to create a separate folder for statistics applications, but you don't need to do that.
-
Use the main folder and open the Editor by pressing
The Stats/List Editor
The screen below is called the Stats/List Editor.
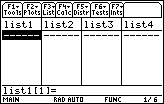
Entering/Deleting Data
As you enter a value, it should appear in the Edit Line. The value should appear in the list after you press
![]() .
.
If you make a mistake, you can type over a value. You can insert entries by using
![]()
![]() or delete entries using
or delete entries using
![]()
![]() . A quick way to delete an entry in a list is to highlight the entry by using the cursor movement keys and then press
. A quick way to delete an entry in a list is to highlight the entry by using the cursor movement keys and then press
![]() .
.
You can clear an entire list's values by moving the cursor to highlight the list name and pressing
![]()
![]() , but pressing
, but pressing
![]()
![]() will not delete an individual entry.
will not delete an individual entry.
Creating a Scatter Plot
Enter the data into two lists such as list1 and list2.
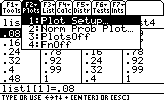
- From the Stats/List Editor, display the Plot Setup ... screen by pressing [F2:Plots]. Then press [1:Plot Setup...].
-
Open the dialog box that will define the scatter plot in one of the nine plots, say Plot1, by highlighting it and pressing
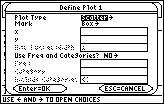
If "Plot Type" does not indicate "Scatter,"
-
Select "Scatter" from the Plot Type submenu by pressing
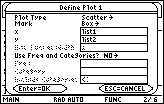
"Mark" should be set to the symbol that will be used to mark each data point.
-
Display the options of Box, Cross, Plus, Square, and Dot by highlighting the "Mark" entry and pressing
-
Select the desired symbol by using
and pressing
Define the Lists that Contain the Variables
- Move the cursor to the entry labeled "x" by using the cursor movement keys
-
Open the list of variables by pressing
[VAR-LINK]
- Highlight the name of the list that contains the independent variable's data (list1) by using the cursor movement keys
-
Paste the name of the chosen list to the dialog box by pressing
-
Save the entry by pressing
Designate the list that contains the y-values by using a similar procedure.
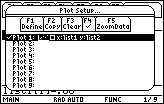
The Define Plot 1 dialog box should have the selections shown.
There are two options for displaying the Scatter Plot at this point: using Zoom Data or entering your own Window Values.
Create the Scatter Plot Using Zoom Data
-
Save the settings and return to the Plot Setup dialog box by pressing
-
Select the Zoom Data feature and view the graph by pressing

Zoom Data will automatically set the Window values to show all data points.
Creating a Scatter Plot with User Defined Window Values
After defining Plot 1 by setting the options in Plot 1's dialog box, you should be at the Plot Setup... screen, as shown below.

-
Open the Window Editor by pressing

-
Set the Window parameters to the desired values
The values are usually set a little outside the values in the table to make sure that each point is shown in the graph window. -
Display the scatter plot by pressing

Auto-Paste from the History Area
-
Highlight the desired command in the History Area by using
and
-
Auto-paste that item to the Entry Line by pressing
Note: If there is something on the edit line that is not highlighted, then what you auto-paste will be combined with what is on the edit line.
Creating and Storing a Regression Equation
Opening the Stats/List Editor.
-
Display the Flash Applications menu by pressing
- Highlight "Stats/List Editor" using the cursor movement keys
-
Open the Stats/List Editor by pressing
Data should be stored in two lists.
Calculating the Regression Equation
-
Display the "Calc" menu by pressing
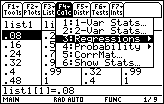
The third option in this menu is "Regressions".
- Display the regression submenu by using the cursor movement keys
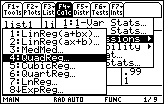
There are many types of functions in this submenu.
- Scroll down with the cursor movement keys and highlight the desired equation type
-
Open the Regression dialog box by pressing
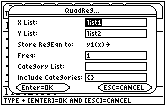
You will specify where the x- and y-values are stored and designate where the regression equation will be stored in this dialog box.
The entry in the "X List" box should indicate the name of the list that contains the x values.
- Enter the name of the list by typing it into the box
-
Save the entry by pressing
The entry in the "Y List" box should indicate the name of the list that contains the y-values.
Storing the Regression Equation into the Y= Editor
The entry beside "Store RegEqn to:" indicates the place where the regression will be stored.
-
Select the "Store RegEqn to:" entry by pressing
-
Display the options by pressing
-
Select the desired function in the Y= Editor where you want the regression equation stored
Note that if your calculator has a function stored in the indicated place, it will be overwritten and lost. If you do not wish to store the regression equation, select "none."
When the values for the Regression dialog box have been properly selected,
-
Compute the regression equation by pressing
This may take some time and BUSY will be shown in the Status Line at the bottom of the screen.
After the calculator creates the regression equation, a screen containing the regression values will appear. The regression equation has been stored in the Y= Editor.
Resetting the Factory Defaults
Press
![]() [MEM]
[MEM]
![]()
![]()
![]()
![]()
![]()
Scatter Plot Keystrokes
-
Press
- Select 1:FlashApps...
- Select Stats/List Editor
- Use the main folder
- Enter the data into two lists, usually list1 and list2
-
Press
 Plots
Plots
- Select 1:Plot Setup...
- Choose the Plot number that you wish to define
-
Press
Define and enter the characteristics of the plot
-
Either press
ZoomData to display the scatter plot in a window that the TI-89 determines or set the window values and then display the plot by pressing
Regression Equation Keystrokes
-
From the Stats/List Editor, press
Calc
- Display the 3:Regression submenu
- Select the desired regression type
- Complete the regression equation's dialog box with the names of the lists that contain the data and where you want the equation to be stored
The names of all lists that currently contain data are found the main folder, which is displayed by pressing
![]()
![]() .
.