This lesson describes the different parts of the keyboard.
At first glance, the keyboard can appear quite complicated. With practice, you will get to know the buttons and learn the logical layout of the keyboard.
The Display Area
The uppermost part of the calculator is the display area. Usually, when the calculator is turned on, the screen referred to as the Home screen is shown in this area. On this screen, you will enter instructions to execute and expressions to evaluate. Menus, which display options that you may select, are also displayed in this area. Your home screen may or may not look like the one shown in the lesson.

Home Screen
The Keyboard Zones
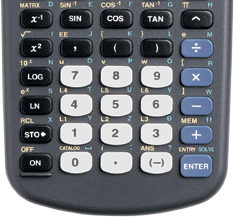
Descriptions and illustrations of the four different zones of the keyboard are shown below. Each zone's name and general use, it's placement on the keyboard and an illustration of the zone are shown. Become familiar with the keyboard zones so that you can follow directions that refer to specific buttons. The pictures shown here are of a TI-83 Plus, the keyboard of the TI-83 is slightly different.
| Name & Use | Position | Illustration |
|
Graphing Keys Used to access graphing and table features |
Top Row |
|
|
Editing Keys Used for editing, navigation, and set-up |
Two rows that begin with
|

|
|
Advanced Function Keys Used to display menus of advanced features |
The row that begins with
|
|
|
Scientific Calculator Keys Used to access the capabilities of a standard scientific calculator |
The bottom six rows |

|
There is a diagram of the keyboard layout on page 2 of the TI-83 Guidebook and on page 3 of the TI-83 Plus Guidebook.
Colors of the Keyboard
Notice the color-coding on the keyboard. Each button has a feature printed on it and it has a secondary feature printed in yellow above it. Most buttons also have a secondary green feature printed above the button as well. There are two modifier keys that access the secondary features:
-
the yellow
 key and
-
the green
 key.
key.
When you press the yellow
![]() key , the character, abbreviation, or word printed in yellow above the keys becomes active for the next keystroke.
key , the character, abbreviation, or word printed in yellow above the keys becomes active for the next keystroke.
When you press the green
![]() key, the character, abbreviation, or word printed in green above the keys becomes active for the next keystroke.
key, the character, abbreviation, or word printed in green above the keys becomes active for the next keystroke.
For example, press
![]()
![]() to access the ten-to-a-power feature, 10x, and press
to access the ten-to-a-power feature, 10x, and press
![]()
![]() to access the letter "N."
to access the letter "N."
Throughout this course, we will use brackets to signify secondary features, such as the letter "A" in the command
![]() [A]. The same notation is used in the TI-83 and the TI-83 Plus Guidebooks.
[A]. The same notation is used in the TI-83 and the TI-83 Plus Guidebooks.
Key Location Method
There are many methods of describing the location of keys. This course will describe key locations using rows and columns, disregarding the top row of graphing keys. For example, the
![]() key is located in the second row, third column of the keyboard.
key is located in the second row, third column of the keyboard.
Experiment with your calculator by performing the operations below.
Turning the Calculator On
-
Turn your calculator on by pressing

The
![]() button is located in the bottom row, first column. Make sure you can see a display that has the blinking cursor
button is located in the bottom row, first column. Make sure you can see a display that has the blinking cursor
![]() . If not, then see Adjusting the Screen Contrast below, or return to the Home screen by pressing
. If not, then see Adjusting the Screen Contrast below, or return to the Home screen by pressing
![]() [QUIT].
[QUIT].
Adjusting the Screen Contrast
You can adjust the display contrast to suit your viewing angle and lighting conditions.
-
To make the screen darker, press and release
 and then press and hold the
 (up editing) key, which is also called the "up arrow."
-
To make the screen lighter, press and release
 then press and hold
 (the down arrow) key.
As you change the contrast setting, a number from 0 (lightest) to 9 (darkest) is shown in the top-right corner to indicate the current contrast level. At 0 the screen may be too light to be seen and the calculator may appear to be off. At 9 the screen may appear totally black.
Adjust your contrast to suit your surroundings.
-
If the contrast is so light that the display disappears, press
 and hold the
 key and the display should return.
-
Alternatively you can press the
 key and then
 or
or
 just once to change the contrast by a small amount.
- Repeat this procedure to set the screen contrast to suit your situation.
Turning the Calculator Off
-
Turn the calculator off manually by pressing
 [OFF]. [OFF] is in the last row, first column.
To prolong the life of the batteries the calculator has an Automatic Power Down™ feature, which will turn the calculator off after about five minutes of inactivity.