Add-On modules enhance Python App module experience with additional functionality and easy access to the additional Python methods from menus in the Python App.
You may notice an Add-On module to load, using TI Connect™ CE, as part of a Python activity posted on education.ti.com such as ce_turtl, ce_chart, ce_box, ce_quivr, and microbit depending on your region. You will need to have the latest version of currently posted Add-On modules Some Add-On modules will load to your calculator, such as ti_draw and ti_image, when you update with the latest CE Bundle.
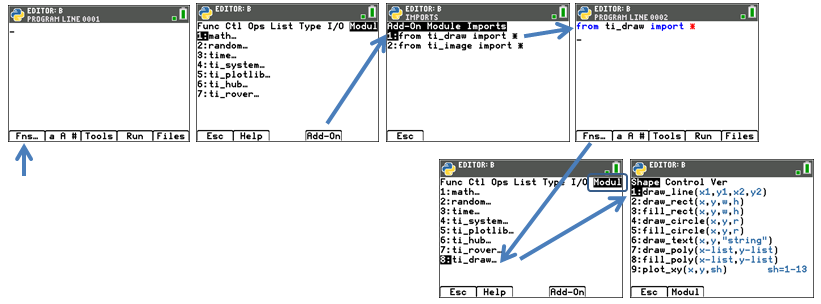
The Python App will display the Add-On module menus in the [Fns…] > Modul menu only if your program in the Editor starts with an appropriate import statement.
Steps:
| 1. | Create a new program. |
| 2. | In Editor, select [Fns…] > Modul. |
| 3. | Select [Add-On] and when an Add-On module is loaded on the calculator, an import statement menu for loaded modules will display. |
| 4. | Select the import statement to paste to the Editor. |
| 5. | Select [Fns…] > Modul to locate the menus for the Add-On imported module. |
| • | [Add-On Modules Imports…] is also listed in [2nd][catalog]. |
| • | Add-On modules are calculator “AppVar” files stored in Archive and appear in [mem] as an AppVar. It is recommended to keep these files in Archive memory for the enhanced Python App module experience. |
| • | A Python program runs in the Python App from File Manager or Editor when the “PY AppVar” program is in RAM. If a PY AppVar Python program is placed in Archive memory, it will not be available to Run or Edit in the Python App. |
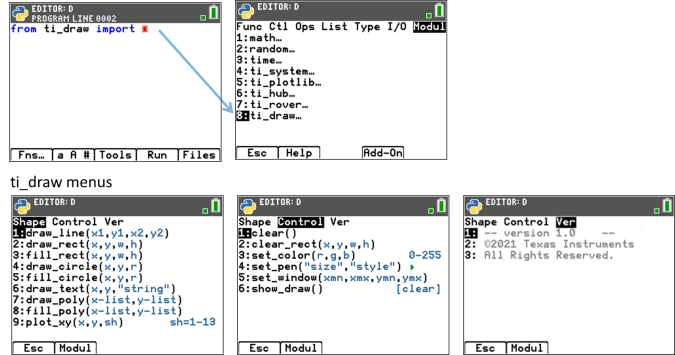
The ti_draw module is included in the latest CE Bundle. Use the [Fns…] > Modul [Add-On] feature to paste the import statement to your program. The ti_draw menu will then display in the [Fns…] > Modul menu as shown here.
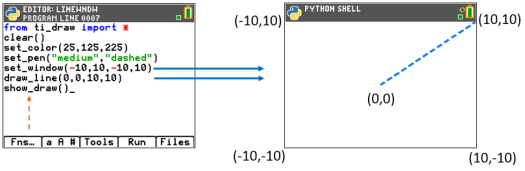
| • | After the import statement, use the clear() method to clear the Shell drawing area if needed. |
| • | Programs must contain the show_draw() command to display the draw when running the program. |
| • | Using draw_rect(), draw_circle(), or draw_poly() methods draw the border of the construction whereas fill_rect(), fill_circle(), and fill_poly() methods fill the interior of the specified shape (dependent on pen size). |
| • | Press [clear] to clear the draw and return to the Shell prompt. Please note: Shell history can be viewed using [2nd] } and [2nd] †. |
| • | Please read through the Shape and Control menu information in the table below. Your drawings created with the methods in the Shape menu will depend on Control menu methods such as set_color() and set_ pen(). |
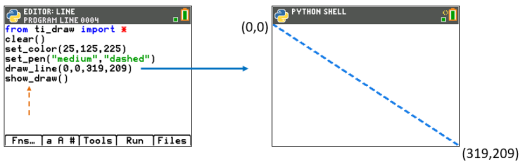
| • | Coordinate arguments are either screen pixel coordinates or set by the set_window() method. |
| - | ti_draw methods using set_window() coordinates |
| - | ti_draw methods using pixel screen coordinates |
|
|
Shape Menu |
Description |
||||||||||||||||||||||||||||
|---|---|---|---|---|---|---|---|---|---|---|---|---|---|---|---|---|---|---|---|---|---|---|---|---|---|---|---|---|---|---|
|
1: |
draw_line(x1,y1,x2,y2) |
Draws a line segment between the specified points (x1,y1) and (x2,y2). |
||||||||||||||||||||||||||||
|
2: |
draw_rect(x,y,w,h) |
Draws a rectangle with upper left corner at (x,y) with a width of w pixels and height of h. |
||||||||||||||||||||||||||||
|
3: |
fill_rect(x,y,w,h) |
Fills the interior of a rectangle with upper left corner at (x,y) with a width of w pixels and height of h pixels. |
||||||||||||||||||||||||||||
|
4: |
draw_circle(x,y,r) |
Draws a circle with center located at (x,y) and a radius of r pixels. |
||||||||||||||||||||||||||||
|
5: |
fill_circle(x,y,r) |
Draws a circle with center located at (x,y) and a radius of r pixels and filled with the specified color (using set_color or black if not defined). |
||||||||||||||||||||||||||||
|
6: |
draw_text(x,y,"string") |
Draws the string as text on the display with upper left corner of the text starting at (x,y). |
||||||||||||||||||||||||||||
|
7: |
draw_poly(x-list,y-list) |
Draws a set of lines that may represent a polygon. The lines are drawn using the current pen size and pen color. |
||||||||||||||||||||||||||||
|
8: |
fill_poly(x-list,y-list) |
The x-list and y-list must be of equal-length of list arguments into a list of (x,y) vertices. The polygon is drawn by connecting each pair of vertices and filling the region with the current pen color. |
||||||||||||||||||||||||||||
|
9: |
poly_xy(x,y,sh) sh=1-13 |
Using the x and y arguments as a center-point location, the requested shape (sh) value below will draw. Shapes are drawn using the current pen color.
|
|
|
Control Menu |
Description |
|---|---|---|
|
1: |
clear() |
Clears the drawing area in the Shell. This method must be executed prior to drawing to ensure the Shell drawing area is cleared to view expected results. |
|
2: |
clear_rect(x,y,w,h) |
Fills the interior of a rectangle with upper left corner at (x,y) and width w height h.
White is the default fill color. After pasting the method to the Editor, the method can accept a fifth optional argument to specify a different color via the use of a tuple specifying (r,g,b) value. A valid (r,g,b) tuple contains integer values in range 0 to 255. |
|
3: |
set_color(r,g,b) 0-255 |
Sets the drawing pen color using (r,g,b) tuple. |
|
4: |
set_pen("size","style") |
Sets the drawing pen to the “size” and “style” for all subsequent drawings until a change is specified.
When importing ti_draw, size is "thin", "medium", or "thick" and style is "solid", "dotted", or "dashed". If not specified, default arguments are "thin" and "solid." The Argument Helper > will help fill the correct argument strings.
Note: When importing ti_plotlib module, pen() method style argument is "solid", "dot", or "dash". |
|
5: |
set_window(xmn,xmx,ymn,ymx) |
Sets the draw area with coordinates ranges [xmin,xmax] and [ymin,ymax] with (0,0) at midpoint of the ranges. Please note: If argument values are outside of the draw area specified, no error is given.
If set_window(xmin,xmax,ymin,ymax) is not executed in a program, the pixel window window size is the default with (xmin,xmax,ymin,ymax) = (0,319,0,209) with (0,0) at upper left hand corner pixel coordinate of the area. |
|
6: |
show_draw() [clear] |
Must be included to display the draw. Press [clear] to clear the draw and return to the Shell prompt. To view Shell history, press [2nd] } and [2nd] †. |
The ti_image module is included in the latest CE Bundle. Use the [Fns…] > Modul [Add-On] feature to paste the import statement to your program. The ti_image menu will then display in the [Fns…] > Modul menu as shown here.
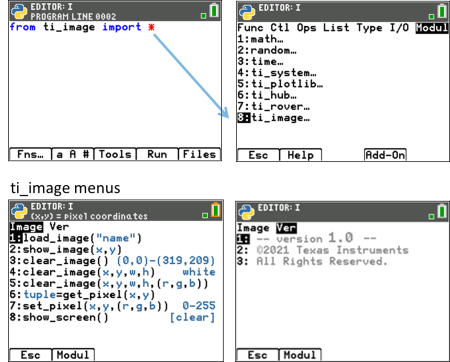
| • | The ti_image module can be used to |
| - | display your named Python image AppVar stored in Archive memory on your CE. |
| - | display specified filled color rectangles in a pixel coordinate location. |
| - | set or get a pixel color. |
| - | clear the interior of a rectangular screen area. |
| - | clear the full screen drawing area in Shell from pixel coordinates (0,0) to (319,209). |
| • | After the import statement, use the clear_image() method to clear the Shell drawing area if needed. |
| • | Python image AppVar is a special Python image file (*.8xv). |
| - | Currently, a library of curriculum images are posted at https://resources.t3europe.eu/t3europe-home?country=15&q=images&cHash=d50a2b65ab1b875dfa3ec11bca12154c |
| - | When using a Python image AppVar, it is best practice to |
| - | store the Python image AppVar in Archive memeory. [2nd][mem] |
| - | know the pixel dimensions of your image for use during coding. |
| - | know the exact name of your Python image AppVar. You must enter the name with the correct spelling and correct upper and lower case letters. No errors will be given for mistyped Python image AppVar names. |
| - | Keep updated with the latest TI Connect™ CE and TI-SmartView™ CE at education.ti.com/84ceupdate |
| • | (x,y) coordinate arguments are pixel coordinates ONLY in ti_image methods and range from (0,0) to (319,209). Please read more information on each method in the table below. Some methods are offered to paste to the Editor in several formats when optional arguments are offered. |
| • | Press [clear] to clear the draw and return to the Shell prompt. Shell history can be viewed using [2nd] } and [2nd] †. |
|
|
Control Menu |
Description |
||||||
|---|---|---|---|---|---|---|---|---|
|
1: |
load_image("name") |
Loads a Python image AppVar "name" for use in the program.
The Python image "name" must be in the exact case and spelling of the Python image AppVar. Please note: There is no error message generated if the AppVar name is NOT specified exactly as named.
Python image "name" will be the image used for display in show_image(x,y).
Best Practices:
|
||||||
|
2: |
show_image(x,y) |
Displays the image specified in load_image(“name”).
Displays the image with upper left pixel corner (x,y) of the drawing area in the Shell. (x,y) screen pixel coordinates range from upper left as (0,0) to lower right (319,209).
If no image name has been specified using load_image(), an error is reported when the program Runs. If “name” is incorrectly entered, no error will display.
Use show_screen() method to retain the image in display until [clear] to return to the Shell. To view Shell history, press [2nd] } and [2nd] †. |
||||||
|
3: |
clear_image() (0,0)-(319,209) |
The clear_image() method with no arguments is used to clear the drawing area of the Shell. The drawing area will display as the white screen.
The pixels coordinates range from upper left as (0,0) to lower right (319,209).
After the full drawing area is "cleared" with this method, use load_image("name") method and show_image(x,y) to display the “name” image as needed.
When also using ti_draw module methods, note that set_pen() color will be set to black when ti_image method, clear_image(), is executed. |
||||||
|
4: |
clear_image(x,y,w,h) white |
Given an (x,y) pixel coordinate for the upper left corner of a rectangle w pixels wide and h pixels high, this method will "clear" the interior rectangular area to white. |
||||||
|
5: |
clear_image(x,y,w,h,(r,g,b)) |
Given an (x,y) pixel coordinate for the upper left corner of a rectangle w pixels wide and h pixels high, this method will "clear" the interior rectangular area to the specified RGB color in given in the tuple (r,g,b). |
||||||
|
6: |
tuple=get_pixel(x,y) |
Returns RGB values of the pixel at pixel coordinate (x,y) as a tuple (r,g,b). |
||||||
|
7: |
set_pixel(x,y,(r,g,b)) |
Sets the color of the pixel at pixel coordinate (x,y) to the RGB color specified in (r,g,b). |
||||||
|
8: |
show_screen() [clear] |
This method must be used to retain the display of the drawing on the screen when using the ti_image module.
When [clear] is pressed after each instance of show_screen(), the program will continue to run until finally clearing the screen to the Shell prompt.
To view Shell history, use [2nd] } and [2nd] †. See Shell > [Tools] for more Shell options. |