| ▶ | Click Tools > Network Manager. |
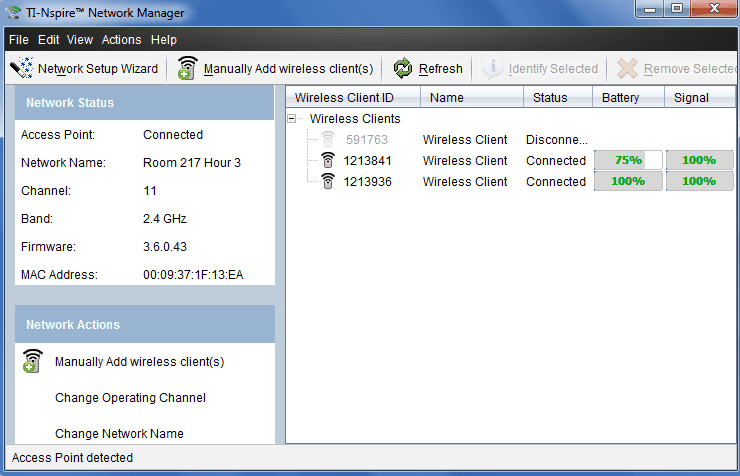
The TI‑Nspire™ Network Manager opens.
Note: Click  Refresh at any time to refresh the TI‑Nspire™ Network Manager window.
You can set up or edit a classroom network at any time using the Network Setup Wizard.
| ▶ | In the TI‑Nspire™ Network Manager window, click Network Setup Wizard. |
The wizard guides you through the process of setting up a classroom network, including:
| • | Update all student and classroom handhelds to the latest operating system (OS) version. The OS on the handhelds must match the software version installed on your computer. |
| • | Connect the access point and, if needed, update the access point firmware. |
| • | Name the class network. |
| • | If required, select a channel for the access point. |
| • | Add wireless clients to your network. |
| • | Create a backup copy of the class network configuration. |
The network status is shown in the side bar of TI‑Nspire™ Network Manager window.
Note: If the sidebar is hidden, click View > Sidebar. Click Refresh to update the status if the Network Manager is already open.
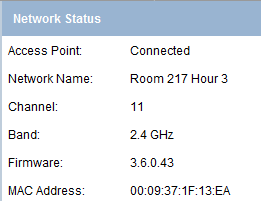
The network status shows the following information:
| • | Access Point. Shows whether the AP is connected or disconnected. |
| • | Network Name. The name you gave the network when you set it up. |
| • | Channel. The access point operating channel for the current network. |
| • | Band. The selected communication link. |
| • | Firmware. The version of the access point. |
| • | MAC Address. The Media Access Control address that identifies the access point. |
After you have set up the network, all of the adapters or cradles you added appear in the TI‑Nspire™ Network Manager window. If the wireless adapter or cradle is charged and attached to a TI‑Nspire™ handheld that is powered on, TI‑Nspire™ Network Manager shows the status as connected. It may take up to 30 seconds to recognize the wireless client and show its status as connected. The status window also displays the battery status and signal strength.
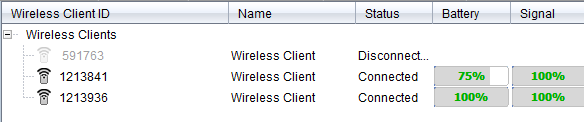
If the cradle is not charged, or the adapter or cradle is not connected to a TI‑Nspire™ handheld that is powered on, TI‑Nspire™ Network Manager displays the status as disconnected. TI‑Nspire™ Network Manager remembers the adapter and cradle IDs you added, and the next time you turn on a handheld that is connected to the adapter or cradle, TI‑Nspire™ Network Manager recognizes it.
The LEDs on each TI‑Nspire™ Navigator™ wireless cradle use various colors and blink patterns to indicate data activity or power status. This can occur either when the cradles are seated in the charging bay or when they are outside the charging bay.
The LEDs indicate status as follows.
 Activity LED
|
Color and pattern |
Meaning |
|
Blinking green |
Indicates data transfer to and from the access point. |
 Battery (Power Status) LED
|
Color and pattern |
Meaning |
|
In the charging bay |
|
|
Solid amber |
The battery is charging. |
|
Solid green |
Power on; charged and powered by a charging bay or power adapter. |
|
Solid red |
The battery is charging, but does not have good contact with the charging bay. Reposition the cradle so it has good contact. The LED should then turn amber to indicate it is recharging. |
|
Outside the charging bay |
|
|
Blinking green |
Power on; battery powered. The battery is 30% to 99% charged. |
|
Blinking amber |
Low battery (less than 30% charged). |
|
Blinking red |
Battery is critically low (less than 8% charged). |
You can manually add wireless adapters or wireless cradles at any time.
When you add a wireless adapter or cradle manually, it immediately appears in the TI‑Nspire™ Network Manager window.
| 1. | In the TI‑Nspire™ Network Manager window, click Manually Add Wireless Client(s). |
The Add Wireless Clients by ID Number dialog box opens.
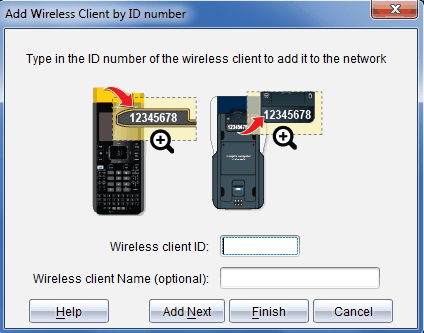
| 2. | For each wireless adapter or cradle you are adding, find the ID number on the back of the adapter or cradle, and type it in the Wireless Client ID box. The ID is the last six digits of the eight-digit number (ignore the first two zeros). |
| 3. | Enter a nickname in the Wireless Client Nickname box (optional). |
Nicknames can consist of letters, spaces, and numbers. A nickname must contain a minimum of 1 character and can contain a maximum of 64 characters.
| 4. | Click Add Next to add another adapter or cradle if you have more than one wireless client to add. |
| 5. | When you are finished adding all the adapters and cradles, click Finish. |
After you manually add wireless clients, you need to associate them to the network using the handhelds.
| 6. | Turn on each TI‑Nspire™ handheld. |
| 7. | Attach the wireless adapter or the wireless cradle to each handheld. (See the instructions for connecting wireless adapters or cradles to a TI‑Nspire™ handheld.) |
| 8. | From the Home screen of the TI‑Nspire™ handheld, select 5:Settings > 6:Network. |
The handheld lists the available networks that are within range.
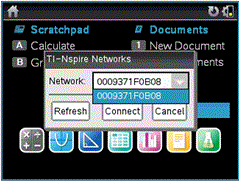
| 9. | Select the network you added the wireless clients to, and click Connect. |
The wireless clients are now associated with the access point.
| 1. | In the TI‑Nspire™ Network Manager window, click Change Operating Channels. |
The Advanced Access Point Options dialog box opens.
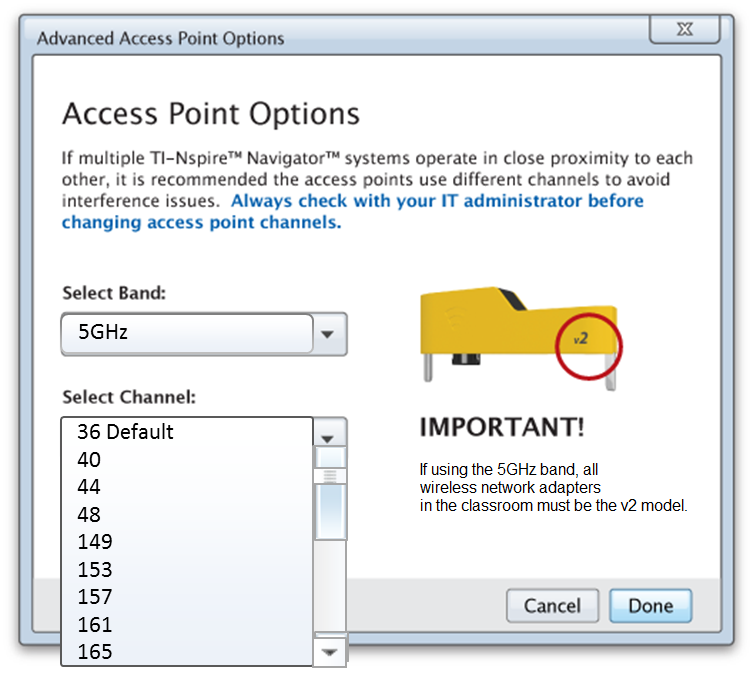
Important! If you are using the TI‑Nspire™ CX Navigator™ network adapter – v2 adapters, you can select either the 2.4GHz or 5GHz band. If you have a mixture of wireless network adapters, you must select the 2.4GHz band.
| 2. | Select a different channel from the drop-down box. |
| 3. | Click Done. |
The Configuring the Access Point dialog box opens and the software configures the access point.
Saving a network setup enables you to reload the configuration at a later time using the TI‑Nspire™ Network Manager. The saved network information includes the list of wireless client IDs, the network name, and the channel and country selected on the access point. By default, the file is saved in the My Documents/TI‑Nspire/Navigator Network folder.
| 1. | In the TI‑Nspire™ Network Manager window, click Actions > Save Network Setup. |
The Save dialog box opens.
| 2. | Name the network and then click Save. You can save the file to another location, if desired. |
Reusing a saved network enables you to reload the configuration of a saved network. Reusing a network can save time because you do not have to set up the network again.
| 1. | In the TI‑Nspire™ Network Manager window, click Actions > Apply Saved Network Setup. |
The Apply a Network dialog box opens.
| 2. | Select the network and then click Apply a Network. |
| 3. | The access point is configured with the saved network configuration. |
To identify wireless clients that are not responding, complete the following steps.
| 1. | From the list of hardware components in the TI‑Nspire™ Network Manager window, click to select the wireless clients. To select more than one wireless client, press and hold the Shift or Ctrl key (Mac®: “ key), and click the items you want to select. |
| 2. | Click Actions > Identify Selected. |
| 3. | Look around your classroom. |
| • | If you are using cradles, both LEDs on the cradles that you selected will blink rapidly with a green color. |
| • | If you are using a docking station, both LEDs on the docking station will blink rapidly with a green color. |
You can identify the wireless clients that are not working because their LEDs are not blinking.
Now that you know where the non-working wireless clients are, you can add them to the network again.
To remove adapters or cradles from the class network, complete the following steps.
| 1. | In the TI‑Nspire™ Network Manager window, select the wireless adapters and cradles that you want to remove from the network. |
| 2. | Click Actions > Removed Selected, or click  . . |
| 3. | When prompted, click Remove. |
The selected wireless clients are removed from the list.
| 1. | In the TI‑Nspire™ Network Manager window, click Actions > Set Default Factory Settings to Access Point. |
The access point is reconfigured to the default factory settings.
| 2. | Click OK when the confirmation message is displayed. |
 Accessing the TI‑Nspire™ Network Manager