Adding Questions
You can add the following types of questions:
|
-
|
Strongly Agree...Strongly Disagree |
|
-
|
Explanation (not auto-graded) |
|
-
|
Text Match (auto-graded) |
|
•
|
Equations and Expressions |
|
•
|
Coordinate Points and Lists |
When you select a question type, a brief explanation of the question is displayed at the bottom of the Choose Question Type dialogue box.
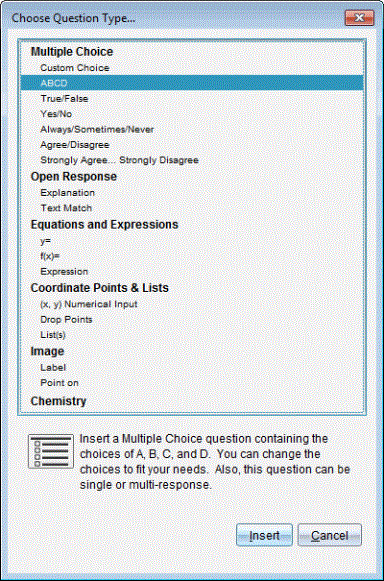
When you open a question template, the cursor is in the Question text area.
Adding a Multiple Choice Question
This example shows how to add a custom multiple choice question. A custom multiple choice question allows you to specify answers your students can select. You can then select one or more responses as correct to help you when grading or to help students check questions that are in Self-Check mode.
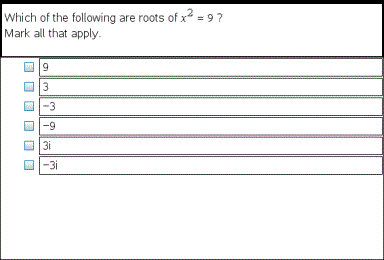
To add a custom multiple-choice question:
The Choose Question Type dialogue box opens.
|
2.
|
Click under the heading. |
The Custom Choice template opens with the cursor in the Question text area.
Two response options exist in the template by default.
|
•
|
You can type any combination of text, maths expressions and chemical equations in the Question Area and Suggested Response area. |
|
•
|
You can add an image in the question text area. |
|
5.
|
Press to add another question line, or press to go to the first Correct Answer button. |
|
6.
|
Type the response options. Add an image, if desired. |
|
7.
|
Press to add other response options, and add the response text. |
|
•
|
Press to clear or delete a response. |
|
•
|
Press to delete an empty response line. |
|
8.
|
Click the option next to a suggested response, if desired. |
Note: In Self-Check mode, the student can check their answer against the suggested response.
|
9.
|
Open the Configuration tool. Choose the response type, and click the option that corresponds to the correct answer. |
Adding an Open Response Question
An open response question prompts the student to write a response. An explanation question type allows students to respond without any predefined answers. A text match question type allows the teacher to specify an answer for the student response. Text match questions are automatically graded; open response questions are not automatically graded.
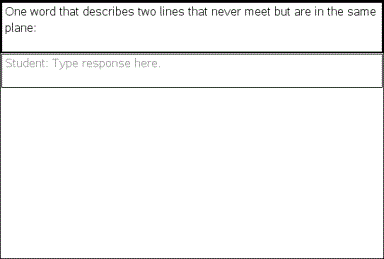
This example shows how to add an explanation question.
The Choose Question Type dialogue box opens.
The Open Response template opens with the cursor in the Question text area.
|
•
|
You can type any combination of text, maths expressions and chemical equations in the Question Area and Suggested Response area. |
|
•
|
You can add an image in the question text area. |
|
•
|
Press or use the mouse pointer to navigate between fields. |
|
5.
|
Open the Configuration tool. Select the response type as Explanation or Text Match, and type the correct answer. |
|
•
|
The Explanation response type allows students to give answers that closely match your suggested response. |
|
•
|
The Text Match response type requires students to exactly match your suggested response. Select the check box if capitalization is not important. |
|
•
|
You can type any combination of text, maths expressions and chemical equations in the Correct Answer area. |
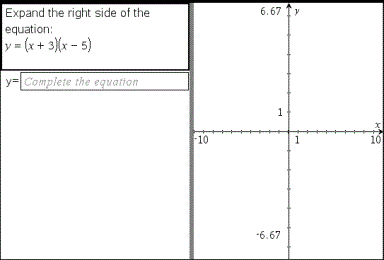
Adding an Equation Question
An equation question prompts the student to write an equation in the form of y= or f(x)=, or to respond with a number or expression.
This example shows how to add a y=question.
The Choose Question Type dialogue box opens.
The equation template opens with the cursor in the Question text area.
|
•
|
You can type any combination of text, maths expressions and chemical equations in the Question Area. |
|
•
|
You can add an image in the question text area. |
|
•
|
Press or use the mouse pointer to navigate between fields. |
|
5.
|
Enter a suggested response, if desired. |
|
6.
|
Press to add other response options, and add the response text. |
|
•
|
Press to clear or delete a response. |
|
•
|
Press to delete an empty response line. |
|
7.
|
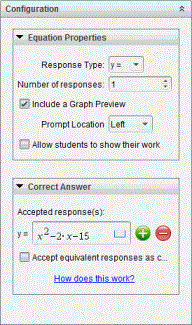
Open the Configuration tool to set the number of responses, the correct answer and whether the students should show their work. You can also add a graph that will show in the Question area. |
|
•
|
The number of responses can range from 1 to 5. |
|
•
|
The option includes areas for the students to write their starting point, their steps and their final answer. The option to show work is disabled if multiple responses are allowed. |
|
•
|
To add a graph in the Question area, check . The Question text area splits to show a graph on the right. |
|
•
|
When you are in the graph, the Graphs & Geometry toolbox is available to allow you to add functions. |
Note: Only the teacher can edit the graph. Students can only view and zoom the graph.
|
•
|
Click  to add additional fields for multiple correct answers. For example, you might want to accept both y=(x+1)(x+2) and y=(x+2)(x+1) as correct answers. to add additional fields for multiple correct answers. For example, you might want to accept both y=(x+1)(x+2) and y=(x+2)(x+1) as correct answers. |
|
•
|
Select whether or not to accept equivalent responses as correct. |
|
-
|
If you do not check Accept equivalent responses as correct, the student response is marked correct if it is an exact text match to one of the accepted responses you entered. |
|
-
|
If you do check Accept equivalent responses as correct, the student response is marked correct if it is equivalent to any accepted response you entered. For example, if you typed x+2 as the correct answer, and the student submits 2+x, this response is equivalent to the accepted response and is automatically graded as correct. Spaces, case differences and extra parentheses are ignored when the software evaluates student answers. For example, y=2x+1 is evaluated the same as Y = 2X + 1. |
Adding an Expression Question
An expression question prompts the student to respond with a number value or an expression.
The Choose Question Type dialogue box opens.
The expression template opens with the cursor in the Question text area.
|
•
|
You can type any combination of text, maths expressions and chemical equations in the Question area. |
|
•
|
You can add an image in the Question area. |
|
5.
|
In the Expression type response, enter a starting expression, if desired. The student sees the starting expression. |
|
6.
|
Enter a suggested response, if desired. |
|
•
|
If you set the response type as Number, the response fields are maths boxes and accept only number values such as 1/3. |
|
•
|
If you set the response type as Expression, the response fields are expression boxes and accept only expression inputs such as 2(3+5). |
|
7.
|
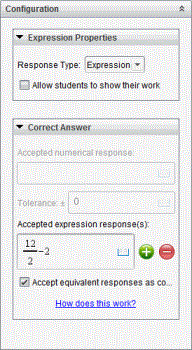
Open the Configuration tool to set the response type as Number or Expression, set whether or not the students should show their work and enter a correct answer. You can also set a tolerance for Number types, or equivalent responses for Expression types. |
|
•
|
The option includes areas for the students to write their starting point, their steps and their final answer. |
|
•
|
In the Number type response, enter the accepted numerical response and the tolerance. Student responses are marked correct if they fall within the tolerance interval you specify. |
|
•
|
Specifying a tolerance of zero indicates you are looking for the exact number answer. Not specifying a tolerance is the same as specifying a tolerance of zero. |
|
•
|
Student answers are considered correct if they are numerically equivalent to the correct answer. Spaces, case differences and extra parentheses are ignored when the software evaluates student answers. |
|
•
|
In the Expression type response, you can add additional fields (up to 10) for multiple correct answers. |
|
•
|
In the Expression type response, click  to open the Templates and Symbols catalogue that allows you to enter 2D maths expressions. to open the Templates and Symbols catalogue that allows you to enter 2D maths expressions. |
|
•
|
In the Expression type response, you can select whether or not to accept equivalent responses as correct. |
|
-
|
If you do not check Accept equivalent responses as correct, the student response is marked correct if it is an exact text match to one of the accepted responses you entered. |
|
-
|
If you do check Accept equivalent responses as correct, the student response is marked correct if it is equivalent to any accepted response you entered. For example, if you typed x+2 as the correct answer, and the student submits 2+x, this response is equivalent to the accepted response and is automatically graded as correct. Spaces, case differences and extra parentheses are ignored when the software evaluates student answers. For example, x+2 is evaluated the same as X + 2.
Important: Students can enter the starting expression you supply and have this response automatically graded as correct. For example, if you ask students to factor x2-7x+12 and stipulate the correct answer is (x-3)(x-4), the student can submit a response of x2-7x+12. This response is automatically graded as correct because it is equivalent to the accepted answer. You must manually mark this student response as incorrect in either the Review or Portfolio Workspaces. See the chapters for those workspaces for more information on marking and grading responses. |
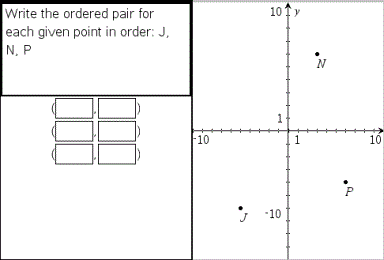
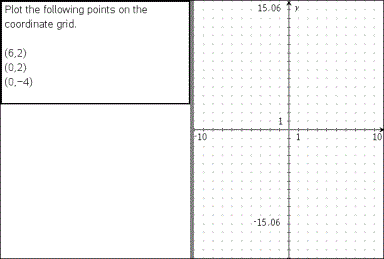
Adding an (x,y) Numerical InputQuestion
An (x,y) numerical input question prompts the student to respond with a coordinate.
The Choose Question Type dialogue box opens.
The template opens with the cursor in the Question text area.
|
•
|
You can type any combination of text, maths expressions and chemical equations in the Question area. |
|
•
|
You can add an image in the Question area. |
|
•
|
Press or use the mouse pointer to navigate between fields. |
|
5.
|
Enter a suggested response, if desired. |
|
•
|
The response fields are expression boxes and accept only expression inputs. |
|
6.
|
Press to add other response options (up to five), and add the response text. |
|
•
|
Press to clear or delete a response. |
|
•
|
Press to delete an empty response line. |
|
7.
|
Open the Configuration tool to set the number of points, add a graph preview, enter a correct answer, and set equivalent responses as correct. |

|
•
|
The number of points can range from 1 to 5. |
|
•
|
Click to add additional fields for multiple correct answers. You can type any combination of text, maths expressions and chemical equations in the correct answer fields. |
|
•
|
Click to open the Templates and Symbols catalogue that allows you to enter 2D maths expressions. |
|
•
|
To add a graph in the Question area, select . The Question text area splits to show a graph on the right and the student prompt area on the left. To change the location of the graph, click the down arrow next to and choose the desired location for the graph in the student prompt area. |
|
•
|
When you are in the graph, the Graphs & Geometry tools are available to allow you to add functions. |
Note: Only the teacher can edit the graph. Students can only view and zoom the graph.
|
•
|
Select whether or not to accept equivalent responses as correct. |
|
-
|
If you do not check Accept equivalent responses as correct, the student response is marked correct if it is an exact text match to one of the accepted responses you entered. |
|
-
|
If you do check Accept equivalent responses as correct, the student response is marked correct if it is equivalent to any accepted response you entered. For example, if you typed (-0.5, .75) as the correct answer, and the student submits (-.5, .75) or (-1/2, 3/4) and so forth, the student response is equivalent to the accepted response and is automatically graded as correct. |
Adding a Drop Points Question
A drop points question inserts a graph and prompts the student to drop points on the graph in response to your question.
The Choose Question Type dialogue box opens.
The drop points template opens with the cursor in the Question text area.
The graph is in the Student answer area.
|
•
|
When you are in the graph, the Graphs & Geometry tools are available to allow you to add functions. |
Note: Only the teacher can edit the graph. Students can only view, zoom, or place points on the graph.
|
•
|
You can type any combination of text, maths expressions and chemical equations in the Question area. |
|
•
|
You can add an image in the Question Area. |
|
•
|
Press or use the mouse pointer to navigate between fields. |
|
5.
|
Open the Configuration tool to set the number of points, hide or show coordinates and enter a correct answer. |
|
•
|
The number of points can range from 1 to 5. |
|
•
|
Showing coordinates is turned off by default. Select the check box to display coordinate labels on the graph. |
|
•
|
Click to add additional fields for multiple correct answers. You can type any combination of text, maths expressions and chemical equations in the correct answer fields. |
|
•
|
Click to open the Templates and Symbols catalogue that allows you to enter 2D maths expressions. |
Adding a Lists Question
A Lists question inserts a list and prompts students to enter data in the lists in response to your question.

The Choose Question Type dialogue box opens.
|
2.
|
Select under the question from the Choose Question Type dialogue box. |
The List template opens with the cursor in the Question text area.
|
•
|
You can add columns or rows, change the name of the lists and input data in the lists, using the same functions allowed in the Lists & Spreadsheet application. |
|
5.
|
Enter initial data in the lists, if desired. |
|
6.
|
Open the Configuration tool to set the number of lists for the student responses. |
|
•
|
The number of lists can range from 1 to 5. |
|
•
|
Lists must have names. The default names are , and so forth. |
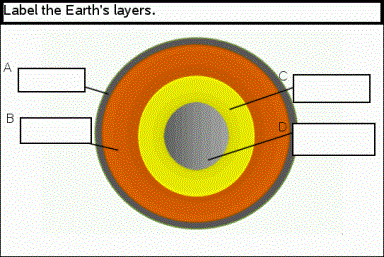
Adding an Image: Label Question
An Image: Label question inserts an image. You can add blank fields to the image and have students fill in the blanks in response to your question.
The Choose Question Type dialogue box opens.
The Image: Label template opens with a blank background and one label. This is where the image for the question is inserted.
|
•
|
You can type any combination of text, maths expressions and chemical equations in the Question area. |
|
•
|
Press or use the mouse pointer to navigate between fields. |
|
5.
|
Insert an image in the bottom portion of the question template. |
|
6.
|
Open the Configuration tool to set the number of responses and to enter answers for each label. |
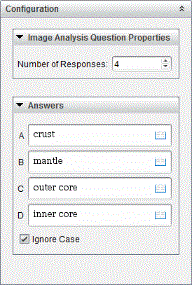
|
•
|
The number of responses determines the number of labels on the image. Each new response gives the label a unique identifier, such as A, B, C and so forth. Drag the labels to the desired location on the image. |
Note: If you set more than 26 responses, the labels are identified with numbers, starting with 1. You can insert a maximum of 35 labels.
|
•
|
In the answers area, click to open the Templates and Symbols catalogue that allows you to enter 2D maths expressions. |
|
•
|
If the label text is too large to fit in the default label size, grab and drag the borders of the label to resize it. |
|
7.
|
Type a suggested response in the labels, if desired. Select the check box if capitalization is not important. |
|
•
|
You can type any combination of text, maths expressions and chemical equations in the response area. |
|
•
|
As you type the suggested response, a ghosted image of your answer appears in the respective label on the image. If the suggested response is too large for the default label size, grab and drag the borders of the label to resize it. |
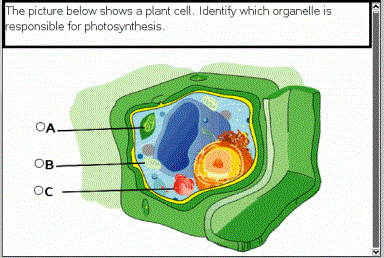
Adding an Image: Point on Question
An Image: Point on question inserts an image. Add check boxes to the image and have students place a check mark in the correct boxes in response to your question.
The Choose Question Type dialogue box opens.
|
2.
|
Select Point on under Image. |
The Image: Point on template opens with a blank background and one point. This is where the image for the question is inserted.
|
•
|
You can type any combination of text, maths expressions and chemical equations in the Question area. |
|
•
|
Press or use the mouse pointer to navigate between fields. |
|
5.
|
Open the Configuration tool to set the response type, number of responses and correct answer. |
|
•
|
The Response Type makes the point a circle for Single Reponse and changes to a square for Multiple Responses to indicate students can select more than one box. |
|
•
|
The number of responses determines the number of points on the image. Each new response gives the point a unique identifier, such as A, B, C and so forth. Drag the points to the desired location on the image. |
Note: If you set more than 26 responses, the points are identified with numbers, starting with 1. You can insert a maximum of 35 points.
|
6.
|
Click a point or points as a suggested response, if desired. |
Adding a Chemistry Question
When you add a Chemistry question, students respond with a chemical formula or equation.
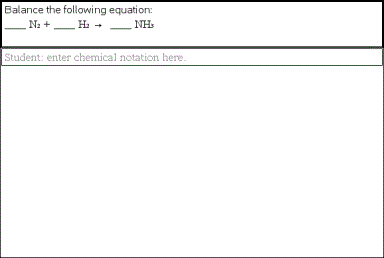
The Choose Question Type dialogue box opens.
The Chemistry template opens with the cursor in the Question text area.
|
•
|
You can type any combination of text, maths expressions and chemical equations in the Question area. |
|
•
|
You can add an image in the Question area. |
|
5.
|
Enter a suggested response, if desired. |
|
6.
|
Open the Configuration tool to enter a correct answer. |
Click to add additional fields for multiple correct answers. You should enter all possible answers. The software does not evaluate equivalency for Chemistry answers.