In a PublishView™ document, text, hyperlinks, images and videos are contained in PublishView™ objects. You can move, resize, copy and paste and delete an object within a PublishView™ document. Objects can also be positioned so that one overlaps the other.
Within a document, PublishView™ objects can exist in three states: unselected, selected and interactive.
|
State |
Description |
||||||||||
|
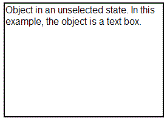
Unselected |
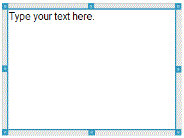
When unselected, an object does not have handles for repositioning and sizing. To deselect an object, left-click or right-click outside the object. In this example, borders around the object are showing. |
|
|||||||||
|
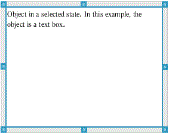
Selected |
When selected, an object will have eight square handles framing the object. To select an object, click the object’s border. When selected, objects can be moved and resized.
|
|
|||||||||
|
Interactive |
An interactive state is indicated by a blue frame around the object. To enter interactive state, left-click or right-click anywhere in the body of the object. When in an interactive state, you can work with the contents of the object. For example, you can add or edit text in a text box or complete maths functions in a TI-Nspire™ application. When in an interactive state, context menus contain options specific to the contents of an object. |
|
|||||||||
Inserting an Object
| 1. | In the Documents Toolbox, ensure the PublishView™ Objects menu is open. |
| 2. | Use your mouse to click an icon and drag it to the document. |
| 3. | Release the mouse button to drop the object into the document. |
|
|
Selected text boxes and frames can be resized, moved, copied, pasted and deleted. |

| 4. | Using the mouse, grab the handles to resize the object and drag it to position the object in the document as needed. |
Opening Object Context Menus
| ▶ | Right-click the border of any object in a PublishView™ document. |
The context menu opens to provide access to delete, copy/paste, cut and bring to front/send to back actions.

Resizing an Object
| 1. | Click any border around the object to select it. The border becomes a bold blue line and the handles are active. |
| 2. | Move your mouse over one of the handles to activate the resizing tool  . . |
| 3. | Grab one of the handles and drag in the direction needed to make the object larger or smaller. |
| 4. | Click outside the object to save the new size. |
Moving an Object
To move an object to another location on the page:
| 1. | Click any border around the object to select it. The border becomes a bold blue line and the handles are active. |
| 2. | Move your cursor over one of the borders to activate the positioning tool  . . |
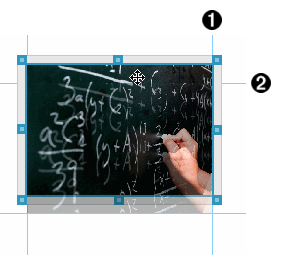
| 3. | Click to grab the object. The horizontal and vertical alignment guides are activated at the top and bottom of the object. Use the grid lines to position the object on the page. |
|
|
|
À vertical alignment guide |
|
Á horizontal alignment guide |
| 4. | Drag the object to a new location on the page. |
| 5. | Release the mouse button to drop the object in its new location. |
Overlapping Objects
You can position objects so that one is on top of another. You can control the stacking order to specify which object is positioned in front or behind the other. Overlapping objects have many practical uses when presenting information in the classroom. For example, you can create a "curtain control" by placing an empty text box over other objects. Then, you can move the text box to reveal the items below it one at a time.
![]()
To change the position of an object in the stacking order:
| 1. | Click the border of the object you want to position to select it, and then right-click to open the context menu. |

| 2. | Click Send to back or Bring to front to move the selected object to the desired position. |
Deleting an Object
To delete an object from a sheet:
| 1. | Click any border of the object to select it. When an object is selected, the border is blue and the handles are active. |
| 2. | Press the Delete key to delete the text box. |
—or—
Right-click a border, and then click Delete from the context menu.
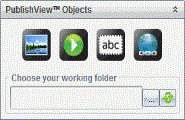
Choosing a Working Folder for PublishView™ Objects
Use the Choose Your Working Folder field in the PublishView™ Objects pane to select a folder for storing PublishView™ documents and related files.
| 1. | Ensure the PublishView™ Objects pane is open. |
| 2. | Click |
The Choose Your Working Folder dialogue box opens.
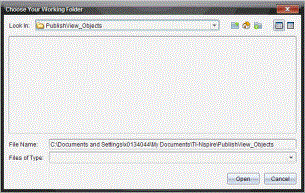
| 3. | Navigate to the folder where you want to store video and image files. |
| 4. | Click Open to choose the working folder. |
The selected folder becomes the working folder and the folder name is displayed in the Choose your working folder field. Previews of supported images and video files in the folder are shown in the PublishView™ objects pane.

| 5. | To add an image or video file to a PublishView™ document, select the file and move it onto the active sheet. |