Creating and Managing Your Teacher Account
Create your teacher account in the Teacher Preferences section of the TI-Nspire™ CX Premium Teacher Software. A teacher account lets you log in to the TI-Nspire™ Navigator™ network from your handheld. After you create a teacher account, you can later change your password or your user name.
Creating Your Teacher Account
|
1.
|
Use the Workspace selector to choose the Class workspace. |
|
2.
|
Click  . . |
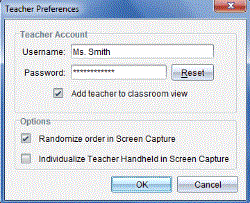
The Teacher Preferences dialogue box opens.

|
5.
|
Select or clear the preference for the teacher icon to appear in the classroom view. |
If you select this preference, the teacher icon will appear in the classroom view, and you will be included as a recipient in Send to Class, Collect from Class, and Delete from Class operations. The teacher handheld screen will be included in screen captures of the class.
|
6.
|
Select or clear the options to randomise the order in Screen Capture, and to individualise the teacher handheld in Screen Capture. |
|
•
|
Randomise order in Screen Capture. Selecting this option captures and displays student screens in a random order, not the order on the class listing. This enables students to concentrate on the assignment, not whose screen they are viewing. |
|
•
|
Individualise Teacher Handheld in Screen Capture. Selecting this option shows the teacher’s screen in the screen capture. |
Changing the Password of Your Teacher Account
|
1.
|
Make sure you are not logged in to the TI-Nspire™ Navigator™ network on your handheld. |
|
2.
|
Click . |
The Teacher Preferences dialogue box opens.
TI-Nspire™ Premium Teacher software clears the current password.
Changing the User Name of Your Teacher Account
|
1.
|
Make sure you are not logged in to the TI-Nspire™ Navigator™ network on your handheld. |
|
2.
|
Click . |
The Teacher Preferences dialogue box opens.
|
3.
|
Enter a new user name. |