Saving Screens When Using Capture Class
You can save captured screens for use in other TI-Nspire™ documents that allow images or for use in other application such as Microsoft® Word. You can save images in the following formats: .jpg, .png or .gif. You can save one image at a time, select multiple images to save or save all captured images.
Saving Screen Images
To save screen images captured when using Capture Class, complete the following steps.
|
1.
|
In the Class Screen Capture window, select the screen or screens you want to save as image files. |
|
•
|
To select multiple consecutive screens, click the first image, and then hold down the key and click the additional images. To select screens in random order, hold down the key (Mac®: “) and click each image you want to save. |
|
•
|
To select all captured screens, click . |
|
2.
|
Click or press (Mac®: “ + S) |
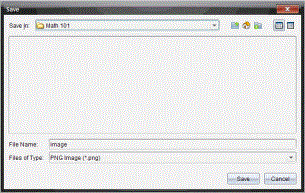
The Save dialogue box opens.
|
3.
|
Navigate to the folder on your computer where you want to save the file(s). |
|
4.
|
Type a name for the file or files in the field. |
The default file name is Image.
|
5.
|
In the field, click ¤, and then select the file type: .png, .jpg or .gif. The default file type is .jpg. |
The file or files are saved in the designated folder.
|
•
|
If you saved one image, the file is saved with the name as specified in the field. |
|
•
|
If you saved multiple images, the files are saved with the name specified in the field with a number appended to the file name to make each file name unique. For example, Image1, Image 2 and so on. |