Entering Test Mode by Choosing Restrictions
Note: This applies to TI-Nspire™ CX and TI-Nspire™ CX CAS software except where noted. If you already have a test code, you can use the Enter Test Code method.
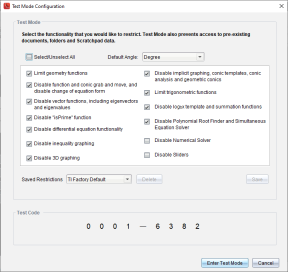
This will open the Test Mode Configuration dialog box.

|
2.
|
On the list, select the angle unit you wish to use. Available units are Degree and Radian. |
|
3.
|
Select the you wish to use. (TI-Nspire™ CX CAS Student Software only) |
|
•
|
enables CAS functions and symbol manipulation. |
|
•
|
enables exact results in terms of stacked fractions, p, and radicals ‡. |
|
•
|
disables CAS and exact results. |
|
4.
|
Select the Exact Arithmetic mode you wish to use. (TI-Nspire™ CX Student Software only with the TI-Nspire™ CX II-T handheld type selected) |
|
•
|
enables exact results in terms of stacked fractions, p, and radicals ‡. |
|
•
|
disables exact results. |
|
5.
|
Click the check box for each restriction to select or deselect it. |
Click the box to quickly select or clear all restrictions.
In the Test Mode Code section, the code will automatically update based on your selections.
Note: For a detailed list of restrictions, refer to Understanding Test Mode Restrictions.
|
6.
|
(Optional) To save the current settings as a named configuration: |
|
b)
|
Type a into the Save Configuration dialog box. |
|
•
|
If there are any open documents or screenshots, you will be prompted to save them. |
|
•
|
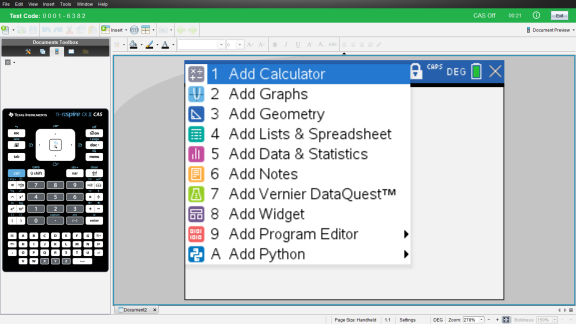
The software window will maximize to the full size of your display and open a new document. |
|
•
|
Pre-existing clipboard and TI-Nspire™ Scratchpad data is deleted. |
|
•
|
A green title bar indicates that the software is in Test Mode. It displays the Configuration Name (if any), Test Code, the CAS or Exact Arithmetic mode status (when appropriate), time elapsed while in the test session, the information icon, and the Exit button. |


