Explore all sides of the TI-Innovator™ Rover when assembled with the TI-Innovator™ Hub and TI CE Graphing Calculator or TI-Nspire™ CX Handheld connected.
 Marker Holder - Holds a marker to draw paths.
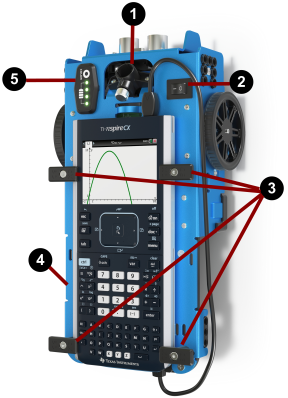
 ON/OFF (I/O) Switch - Turns the Rover ON (–) or OFF (O).
 Calculator Holder Pegs - Secures a graphing calculator to the calculator platform.
 Calculator Platform - Holds either a TI CE Graphing Calculator or
TI-Nspire™ CX Handheld.
 LED Panel (RGB LED/Battery Level Indicator) - Displays programmable feedback through the Red-Green-Blue (RGB) LED, and displays battery charge level.

 Color Sensor - Bottom-mounted color sensor detects the color of the surface. Can also detect gray-level scale of black (0) to white (255).
Gyroscope - Measures or maintains orientation.
I2C expansion port.
Ball Caster - Provides smooth movement on hard surface.
Note: Not recommended for use on carpet.
Caution: If you dislodge or disconnect any of the cables, use this image as a reference for correct hookups.
Ultrasonic Ranger - Measures distance to obstacles.

Guide Rails - Allows the Hub to slide easily into the Rover and connect to the Rover circuit board.
Note: With the TI-Innovator™ Hub inserted, access a sensor and two ports.
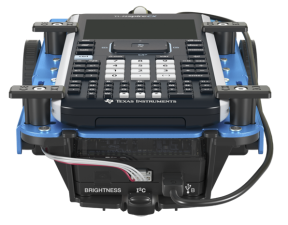
| • | Light Brightness Sensor - Reads as "BRIGHTNESS" in Hub command strings. |
| • | I2C port - Uses I2C cable to connect the Hub to the Rover circuit board. |
| • | DATA Mini‑B port - Uses USB Unit‑to‑Unit (Mini‑A to Mini‑B) Cable to connect the Hub to a Graphing Calculator. |
Access on the Rover:
| • | PWR port - Uses USB Standard A to Micro auxiliary power cable when charging the Rover's Rechargeable battery. |
| • | Front and Back Mounts - For adding structures to the Rover using interlocking plastic blocks. |

Note: With the Hub inserted, access three ports for controlling output modules.
| • | OUT 1 and OUT 2 provide 3.3V power. |
| • | OUT 3 provides 5V power. |
Access on the Rover:
| • | Front and Back Mounts - For adding structures to the Rover using interlocking plastic blocks. |

Note: With the Hub inserted, access three ports for collecting data or status from input modules.
| • | IN 1 and IN 2 provide 3.3V power. |
| • | IN 3 provides 5V power. |
![]()