In this lesson you will model the motion of a particle that moves along the x-axis by using parametric equations. The motion of the particle will be illustrated by using the TI-89 to show animated movement. You will also see that parametric equations that model a particle's movement are not unique by developing different parametric equations to model the same movement.
A particle moves along the x-axis so that its position is given by the equation below, where t represents time in seconds.
x(t) = 2t3 – 9t2 + 12t + 1
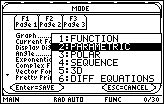
You can use your TI-89 to visualize the motion of the particle and determine when the particle is at rest, when it is moving to the right, and when it is moving to the left. To graph parametric equations on the
-
Open the Graph setting in the Mode dialog box by pressing


-
Highlight 2:PARAMETRIC by pressing

-
Select the highlighted item by pressing

-
Exit the Mode dialog box by pressing
Entering the Parametric Function
-
Open the Y= Editor by pressing
 [Y=]
[Y=]
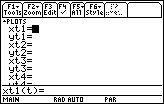
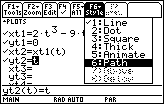
Instead of entering y as a function of x you will enter x and y as functions of t. Because x and y are both functions of a common parameter t, these equations are called parametric equations.
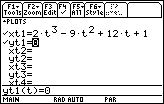
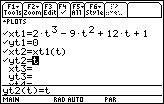
- Set xt1 = 2t^3 – 9t^2 + 12t + 1
-
Set yt1 = 0
yt1 is 0 because the particle is moving along the x-axis.
|
|||
|
|
|||
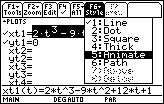
Setting the Graph Style to Animate
You can view an animation of the particle's motion by changing the Graph Style of xt1 to animate.
- Move the cursor to xt1
-
Open the Style menu by pressing


- Highlight 5:Animate
-
Select the highlighted item by pressing
Setting the Viewing Window
-
Open the Window editor by pressing

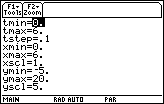
In addition to the minimum and maximum values for x and y there is a third variable in this menu, t.
- Enter the values shown below
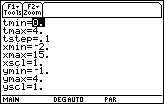
With the values shown, t will initially be 0 and then increase by steps of one tenth until it is 4. For each value of t the position of the particle, as determined by the corresponding x and y-values, will be plotted. xmin, xmax, ymin and ymax determine what part of the xy-plane will be shown in the viewing window the same way they do in FUNCTION graphing mode.
-
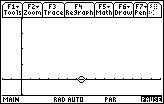
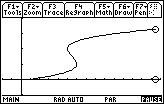
Display the graph by pressing

You should see a circle move along the x-axis. This circle follows the path of the particle over the time interval from t = 0 to t = 4.
You can see the graph again by pressing
![]() to Regraph.
to Regraph.
Using the Trace Feature
The Trace feature can produce a similar animated effect.
-
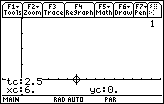
Activate the Trace cursor by pressing

- Move the Trace cursor along the path of the particle by using the cursor movement keys
Try pressing the left or right arrow and holding it down.
Tracing Time
Notice that the
![]() key moves the particle forward in time, which may not always coincide with motion to the right and that the
key moves the particle forward in time, which may not always coincide with motion to the right and that the
![]() key moves the cursor back in time, which may not always coincide with motion to the left. The value of t and the x- and y- coordinates are shown at the bottom of the screen.
key moves the cursor back in time, which may not always coincide with motion to the left. The value of t and the x- and y- coordinates are shown at the bottom of the screen.
12.1.1 Use the cursor movement keys to estimate when the particle is moving to the right.
Click here for the answer.
12.1.2 Estimate when the particle is moving to the left.
Click here for the answer.
12.1.3 When does the particle appear to change direction?
Click here for the answer.
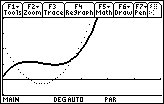
Visualizing the Path over Time
The animation on the x-axis is a fairly realistic model for the motion of the particle, however it is difficult to see the time intervals when the particle moves left and moves right. Make the following additions in the Y= Editor to help visualize the motion of the particle over the six seconds.
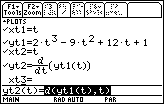
- Set xt2 = xt1(t)
- Set yt2 = t
Setting the Graph Style
- Select yt2 by moving the cursor to yt2
-
Open the Style menu by pressing
- Highlight "6:Path"
-
Save this selection by pressing
Setting the Graph Order
-
Open the Graph Formats dialog box by pressing


- Move the cursor to "Graph Order"
-
Highlight "2:SIMUL" by pressing
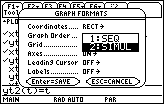
SIMUL stands for simultaneous mode in which all the selected functions will be graphed at the same time.
-
Save this selection and exit the Graph Formats dialog box by pressing
Displaying the Graphs
-
Display the simultaneously drawn graphs by pressing
The animation can be paused before the two graphs go off the screen by pressing
![]() . Notice the highlighted PAUSE at the bottom right of the screen below. You can restart the graphs by pressing
. Notice the highlighted PAUSE at the bottom right of the screen below. You can restart the graphs by pressing
![]() , or press
, or press
![]() to regraph starting at t = 0.
to regraph starting at t = 0.
12.1.4 What feature of this graph shows the times when the particle appears to change direction?
Click here for the answer.
A Different Model of the Particle's Motion
Parametric equations can be used to make a different model of the same particle motion. The functions below represent the same motion shown earlier, but time is shown on the x-axis and the particle's position is represented by the y-values. Set the graphing style to thick.
- Set xt1 = t
- Set yt1 = 2t^3 - 9t^2 + 12t + 1
The particle's instantaneous velocity can be displayed along with its position. Defining new parametric equations where the x-values represent time and the y-values represent the particle's instantaneous velocity (the derivative of the function in yt1) can do this.
- Set xt2 = t
-
Set yt2 = d(yt1(t),t)
Use the key for d.
- Set the graphing style to Dot
- Change the Viewing Window values to those shown below
- Graph the equations
12.1.5 How do these graphs show when the particle is moving left, moving right, and at rest?
Click here for the answer.